|
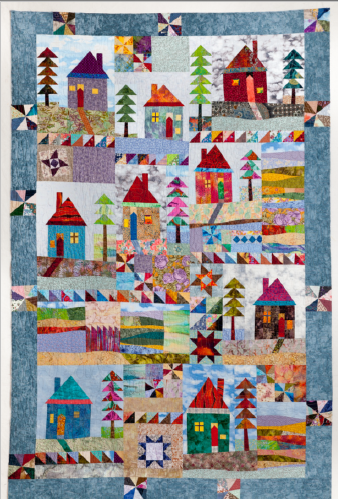
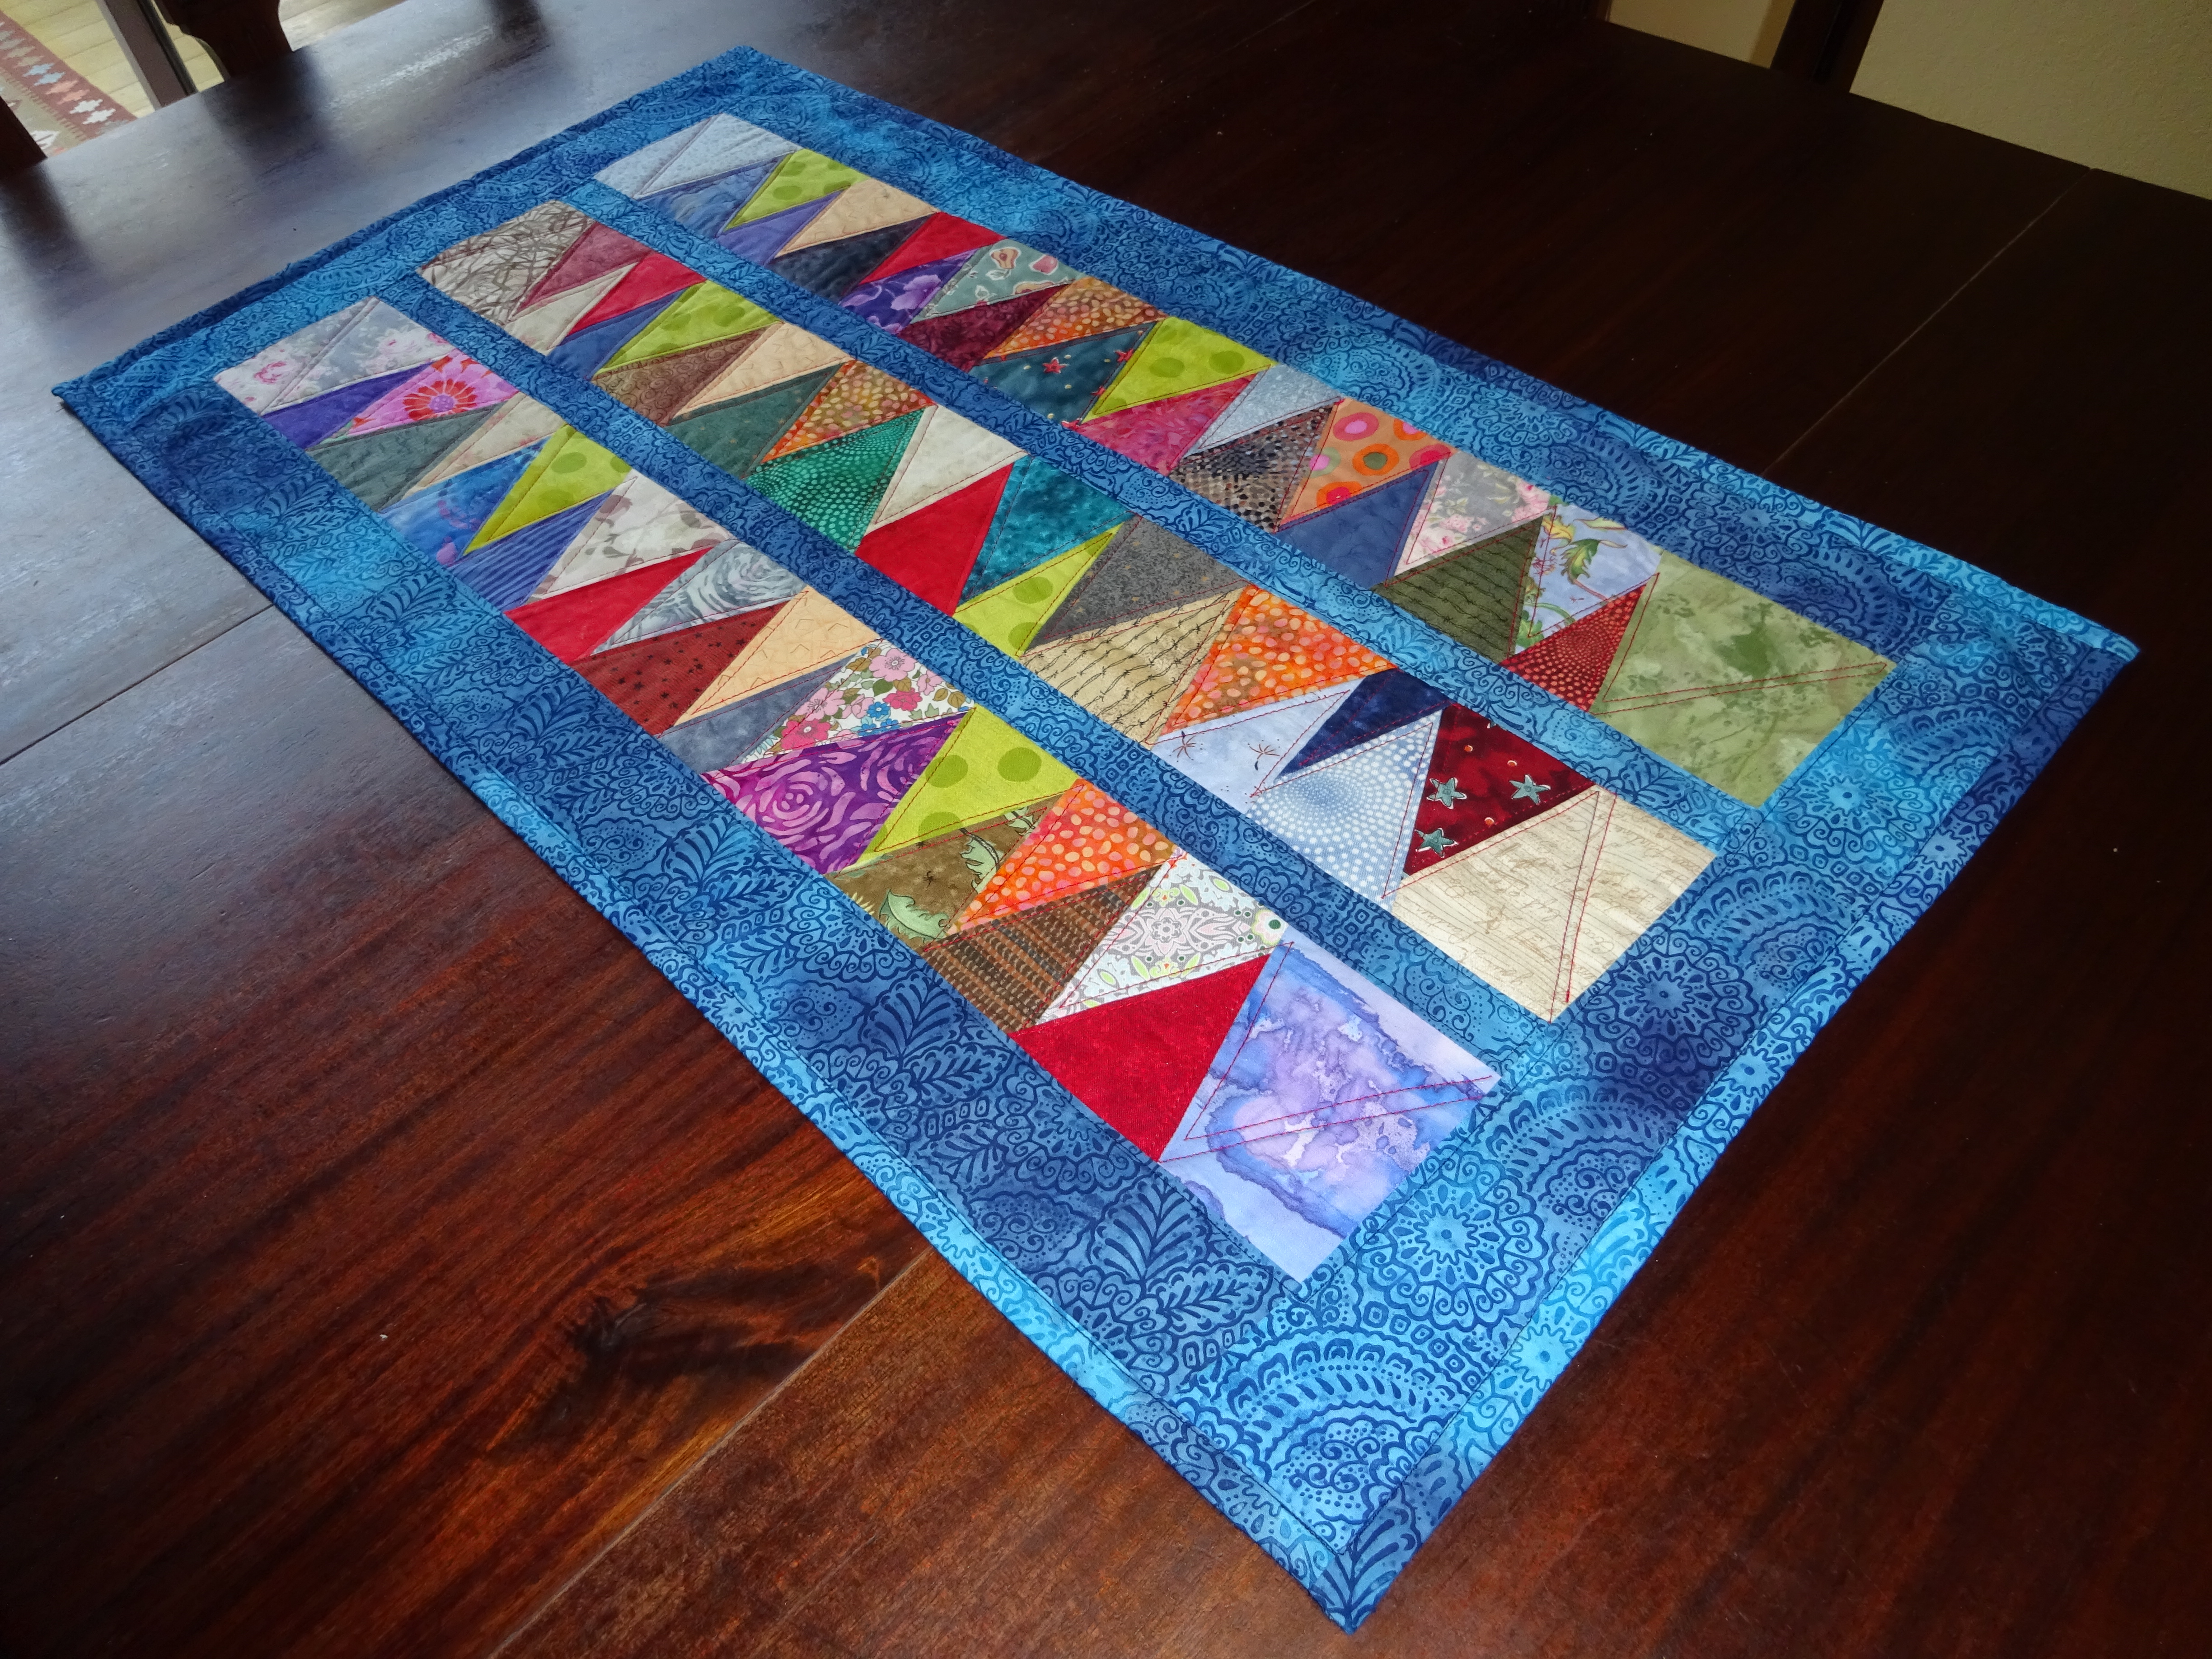
Liberated piecing techniques are applied to house blocks to give your quilts that contemporary look. This is an
improvisational way of working without templates and no two house blocks turn out the same. Quick pieced flying geese
units are adapted to make pine trees, then a border of irregular sawtooth sashing and simple blocks completes your quilt
or wallhanging which can be made any size from small wallhanging to king size. You will learn a variety of piecing
techniques including how to fit all these separate pieces together into an effective and individual quilt.
All template free. A relaxed day when you don't have to worry too much about precision piecing. Ideal for scrapbag quilts
to use up those bits.
Students will need to be familiar with the rotary cutting set and straight stitch on the sewing machine.
Any spare blocks you have from previous projects may be fitted in to these quilts so
bring them along if you have any.
Fabrics
Bring along a selection of fabrics in contrasting values and colours (including green for the trees)
- fat or long quarters and smaller pieces including brights, contemporary patterned
(i.e. geometric, marbled, textured etc),(eighth or quarter) . Twelve to fifteen different fabrics minimum.
About half a metre of of pale blue to represent sky - this could be textured as in hand dyed or marbled or
just plain blue.Hand dyes if you have them would work well for some of these blocks.
|
No need for templates or any measuring when you make the colour blocks in this technique. You select a set of fabrics
to work with, which can be arrestingly bright, or a co -ordinating colour scheme, depending on your mood,
then cut and sew. It's as easy as that! Minimal measuring or marking makes this a relaxing day when you can
let go, enjoy yourself and create surprisingly fast results.The second block in the workshop combines well
with 'colour blocks' and is totally liberated piecing. No two stars turn out the same and you can make them
in any size, which can be made to fit alongside the colour blocks using Katharine's fiendish fudging methods.
The blocks can be used in a number of ways and are suitable for quilts, cushions or bags.Students must be familiar
with the rotary cutting set and sewing machine. If time we will also cover the ‘tilted pinwheel’ block which combines
well with the previous two.Skill level: Beginner, but it is useful if you have experience in using the rotary cutting
set and sewing a straight line on the sewing machine. If you are a complete beginner you will be given tuition on these
techniques.
Fabrics
-
Dress/patchwork weight cotton. For the colour blocks select fabrics which in your opinion will
harmonise or contrast successfully. Hand dyes work well with this project. Eight fabrics needed altogether.
(If you are not sure about this bring what you can and I will help with selection.)
Anything larger than 9” (22 cm) squares will do.
- For the Wacky Stars you will need between two and four fat quarters in bright contrasting colour pairs.
i.e. light / dark, or bright / dark.
|
|
|
Crazy Patchwork is one of the earliest recorded patterns in patchwork, popular initially for providing
the opportunity to recycle randomly shaped pieces of fabric into utility quilts. From this developed
a tradition of rich and decorative quilts to show off fine fabrics covered in embroidery.
This workshop will show you how to incorporate elements of pieced patchwork into crazy blocks giving
opportunities to use up pieces of unfinished projects along with scrap bag remnants.
Techniques covered will be rotary cutting and quick piecing of half and quarter square triangles and
flying geese teamed with improvisational construction, using straight and curved seams.
Tips on how to select and balance colours and composition will also be covered.
The resulting blocks can be used in small projects such as a useful zipped pouch
or built into a collection to make into a quilt.
Fabrics.
Bring a selection of fabrics which in your opinion will work well together. Patterns in
various styles : floral, geometric, marbled and hand dyes, etc. Scraps or fat quarters.
Also any left over blocks you may have from previous projects. If you want to make the pouch
bring a piece of wadding and lining for the inside 16” x 12” and a 12” zip plus a fat quarter for the binding.
|
|
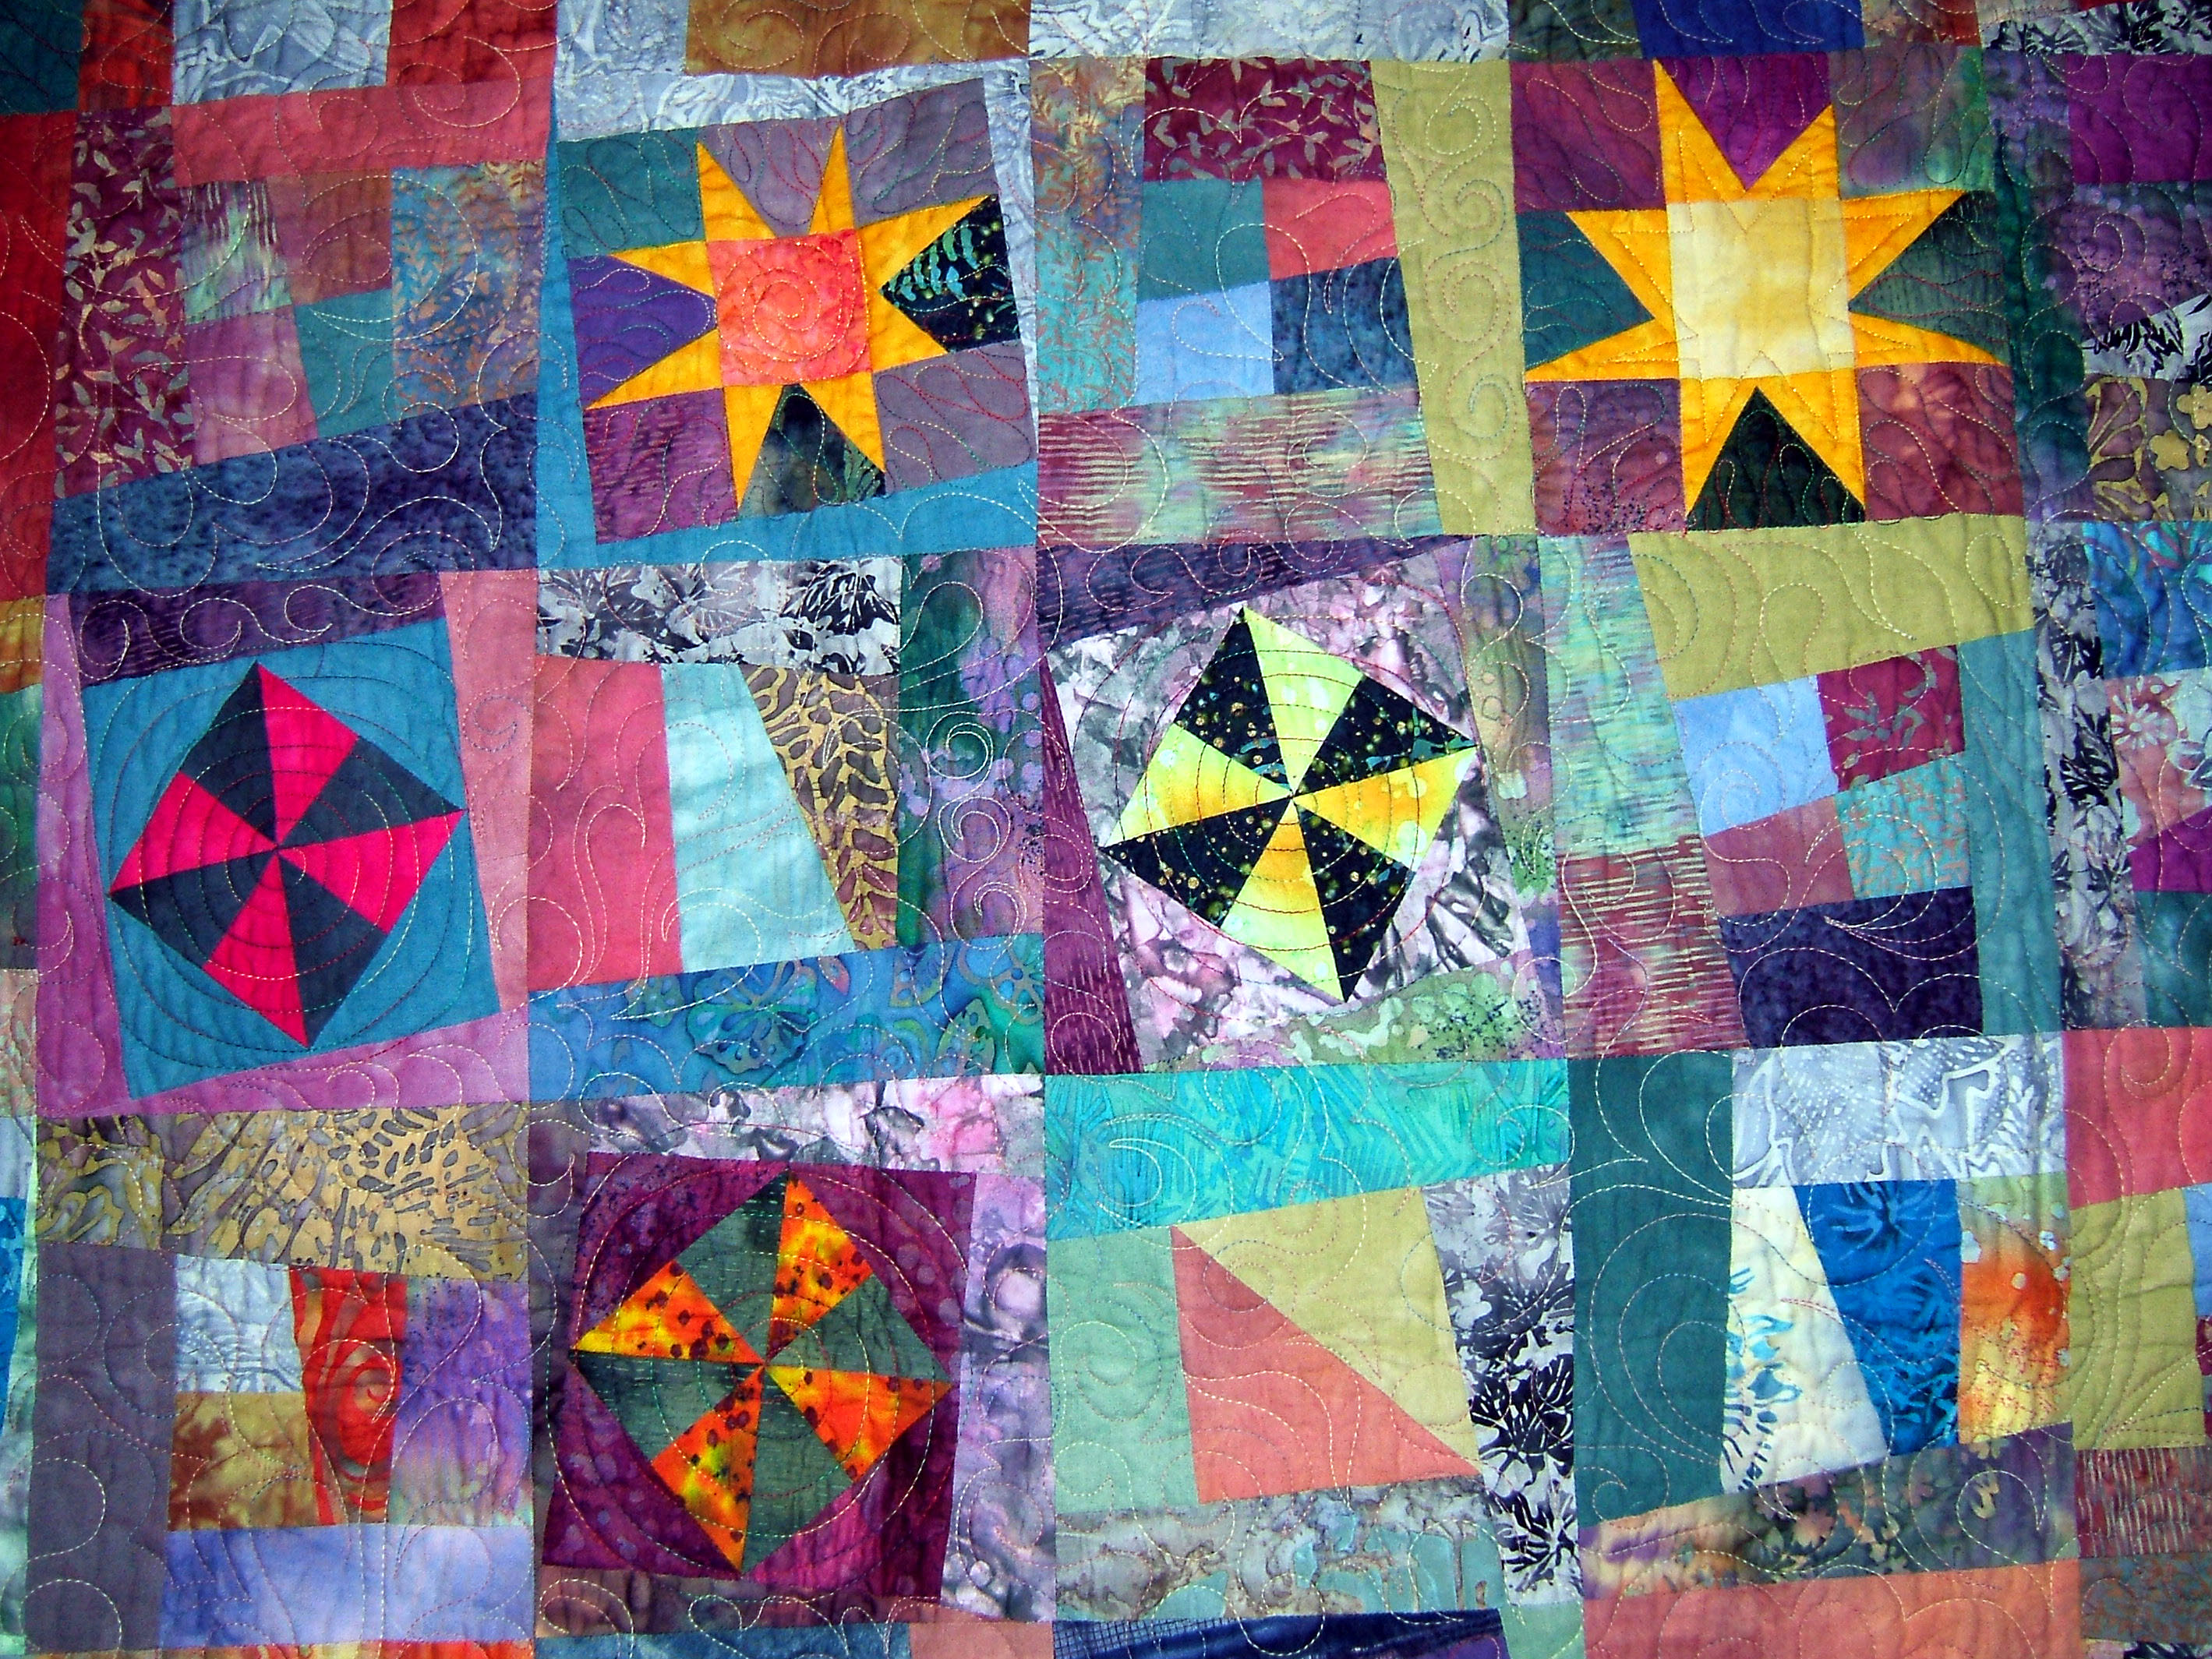
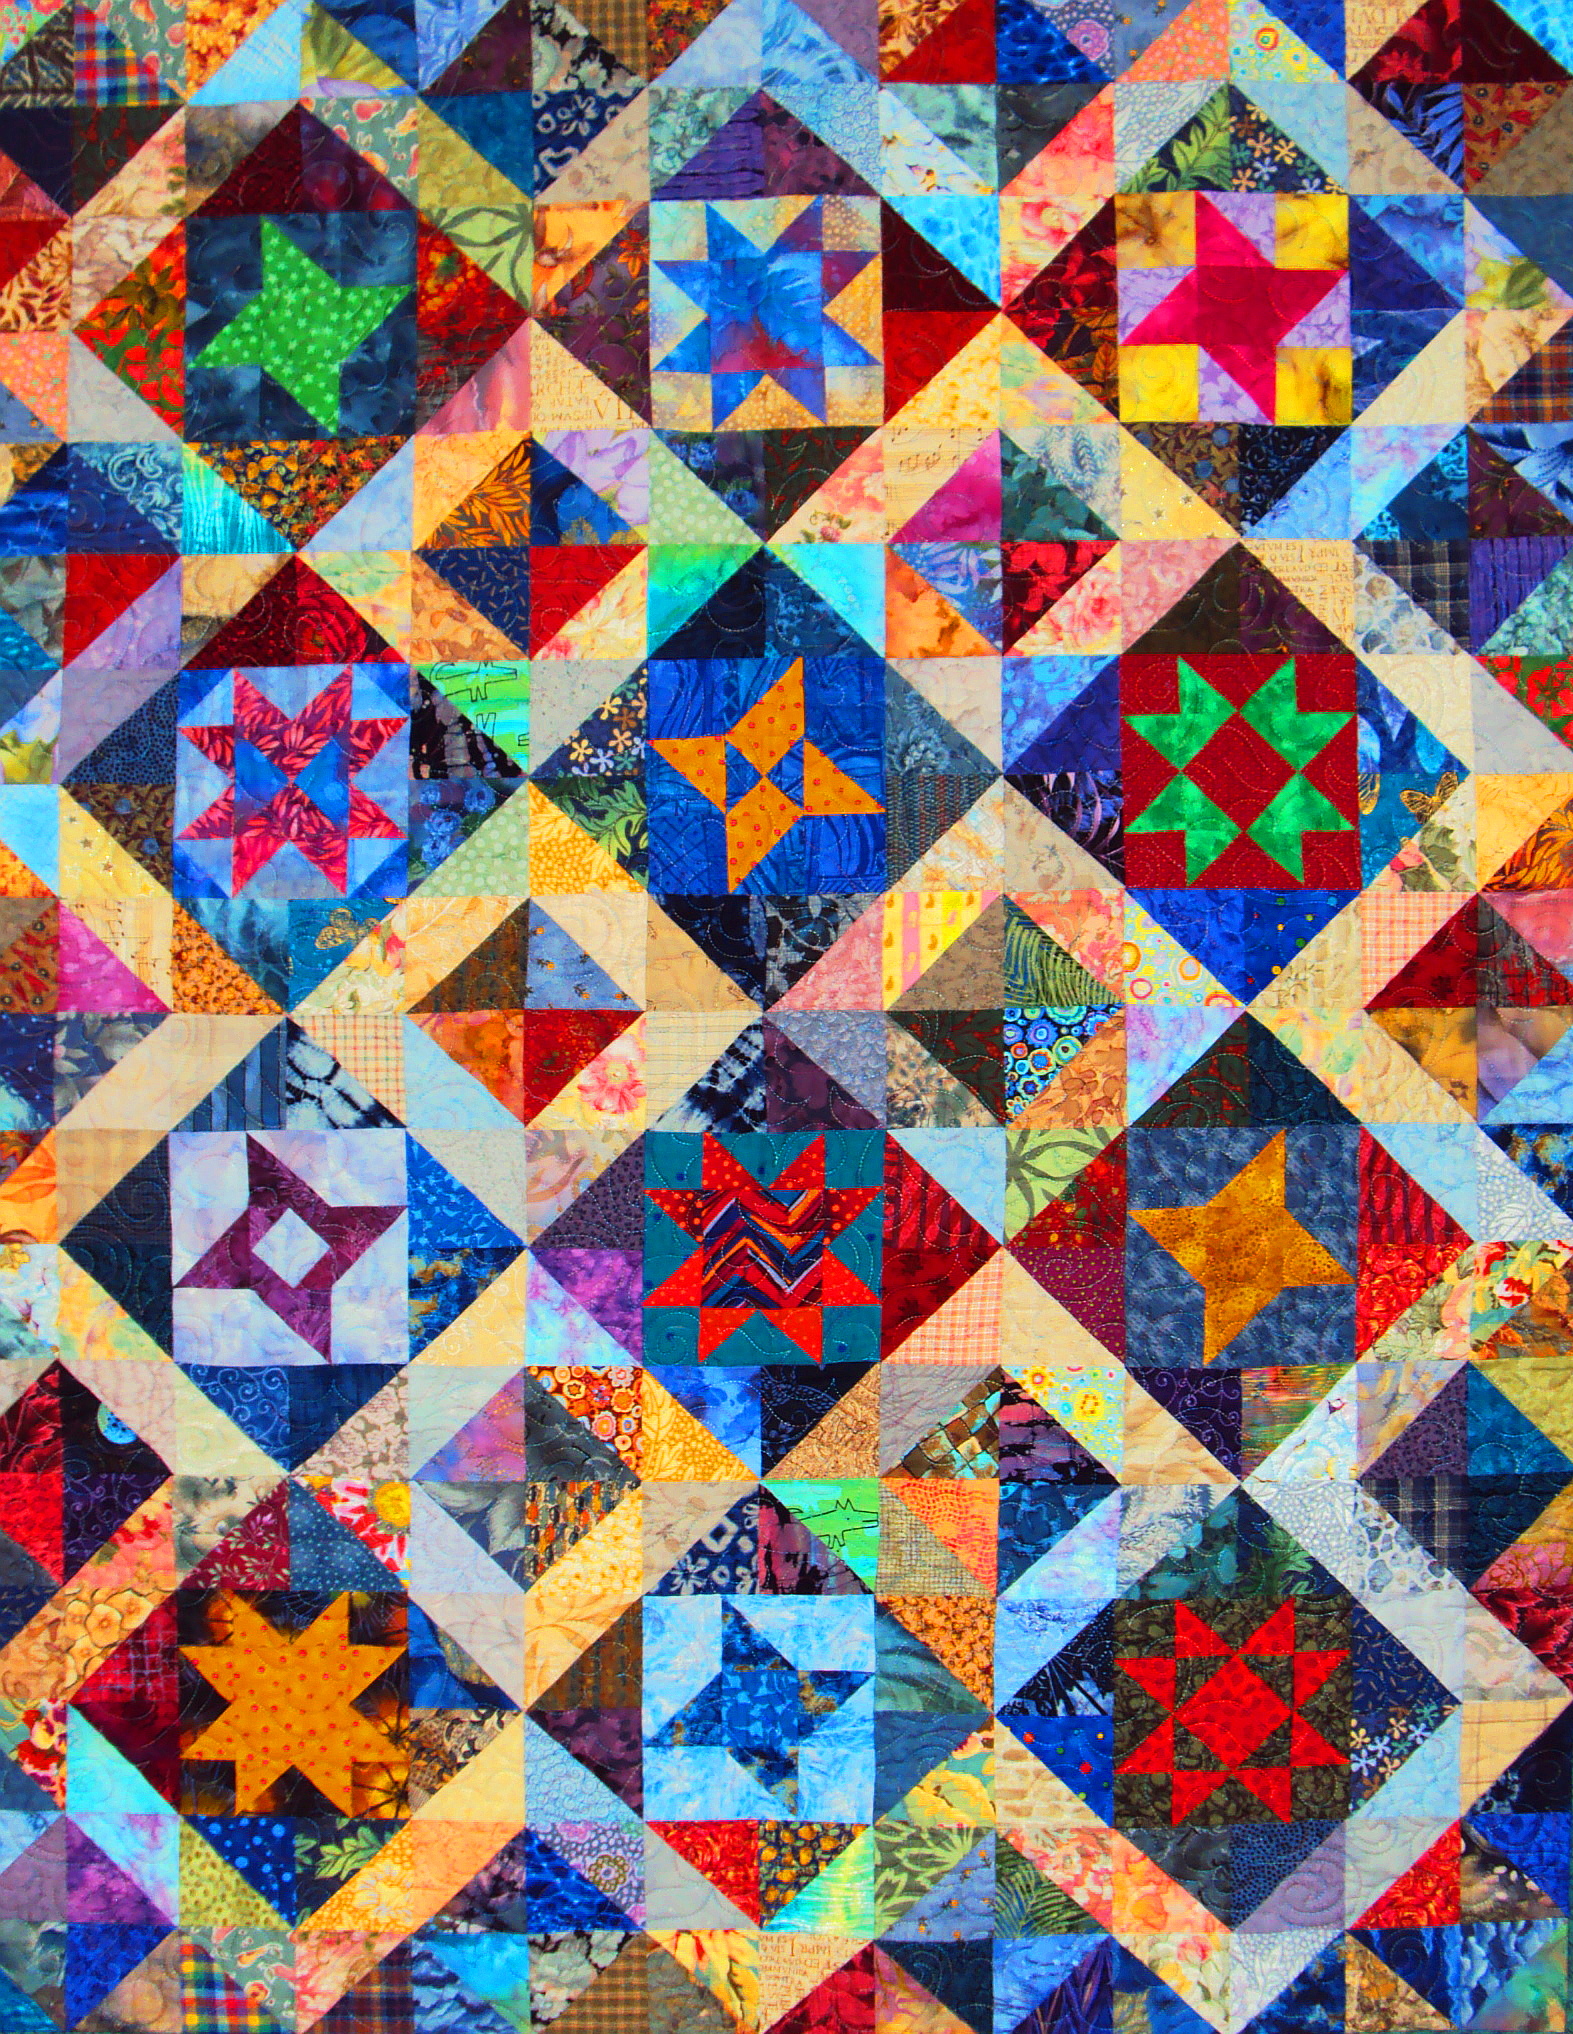
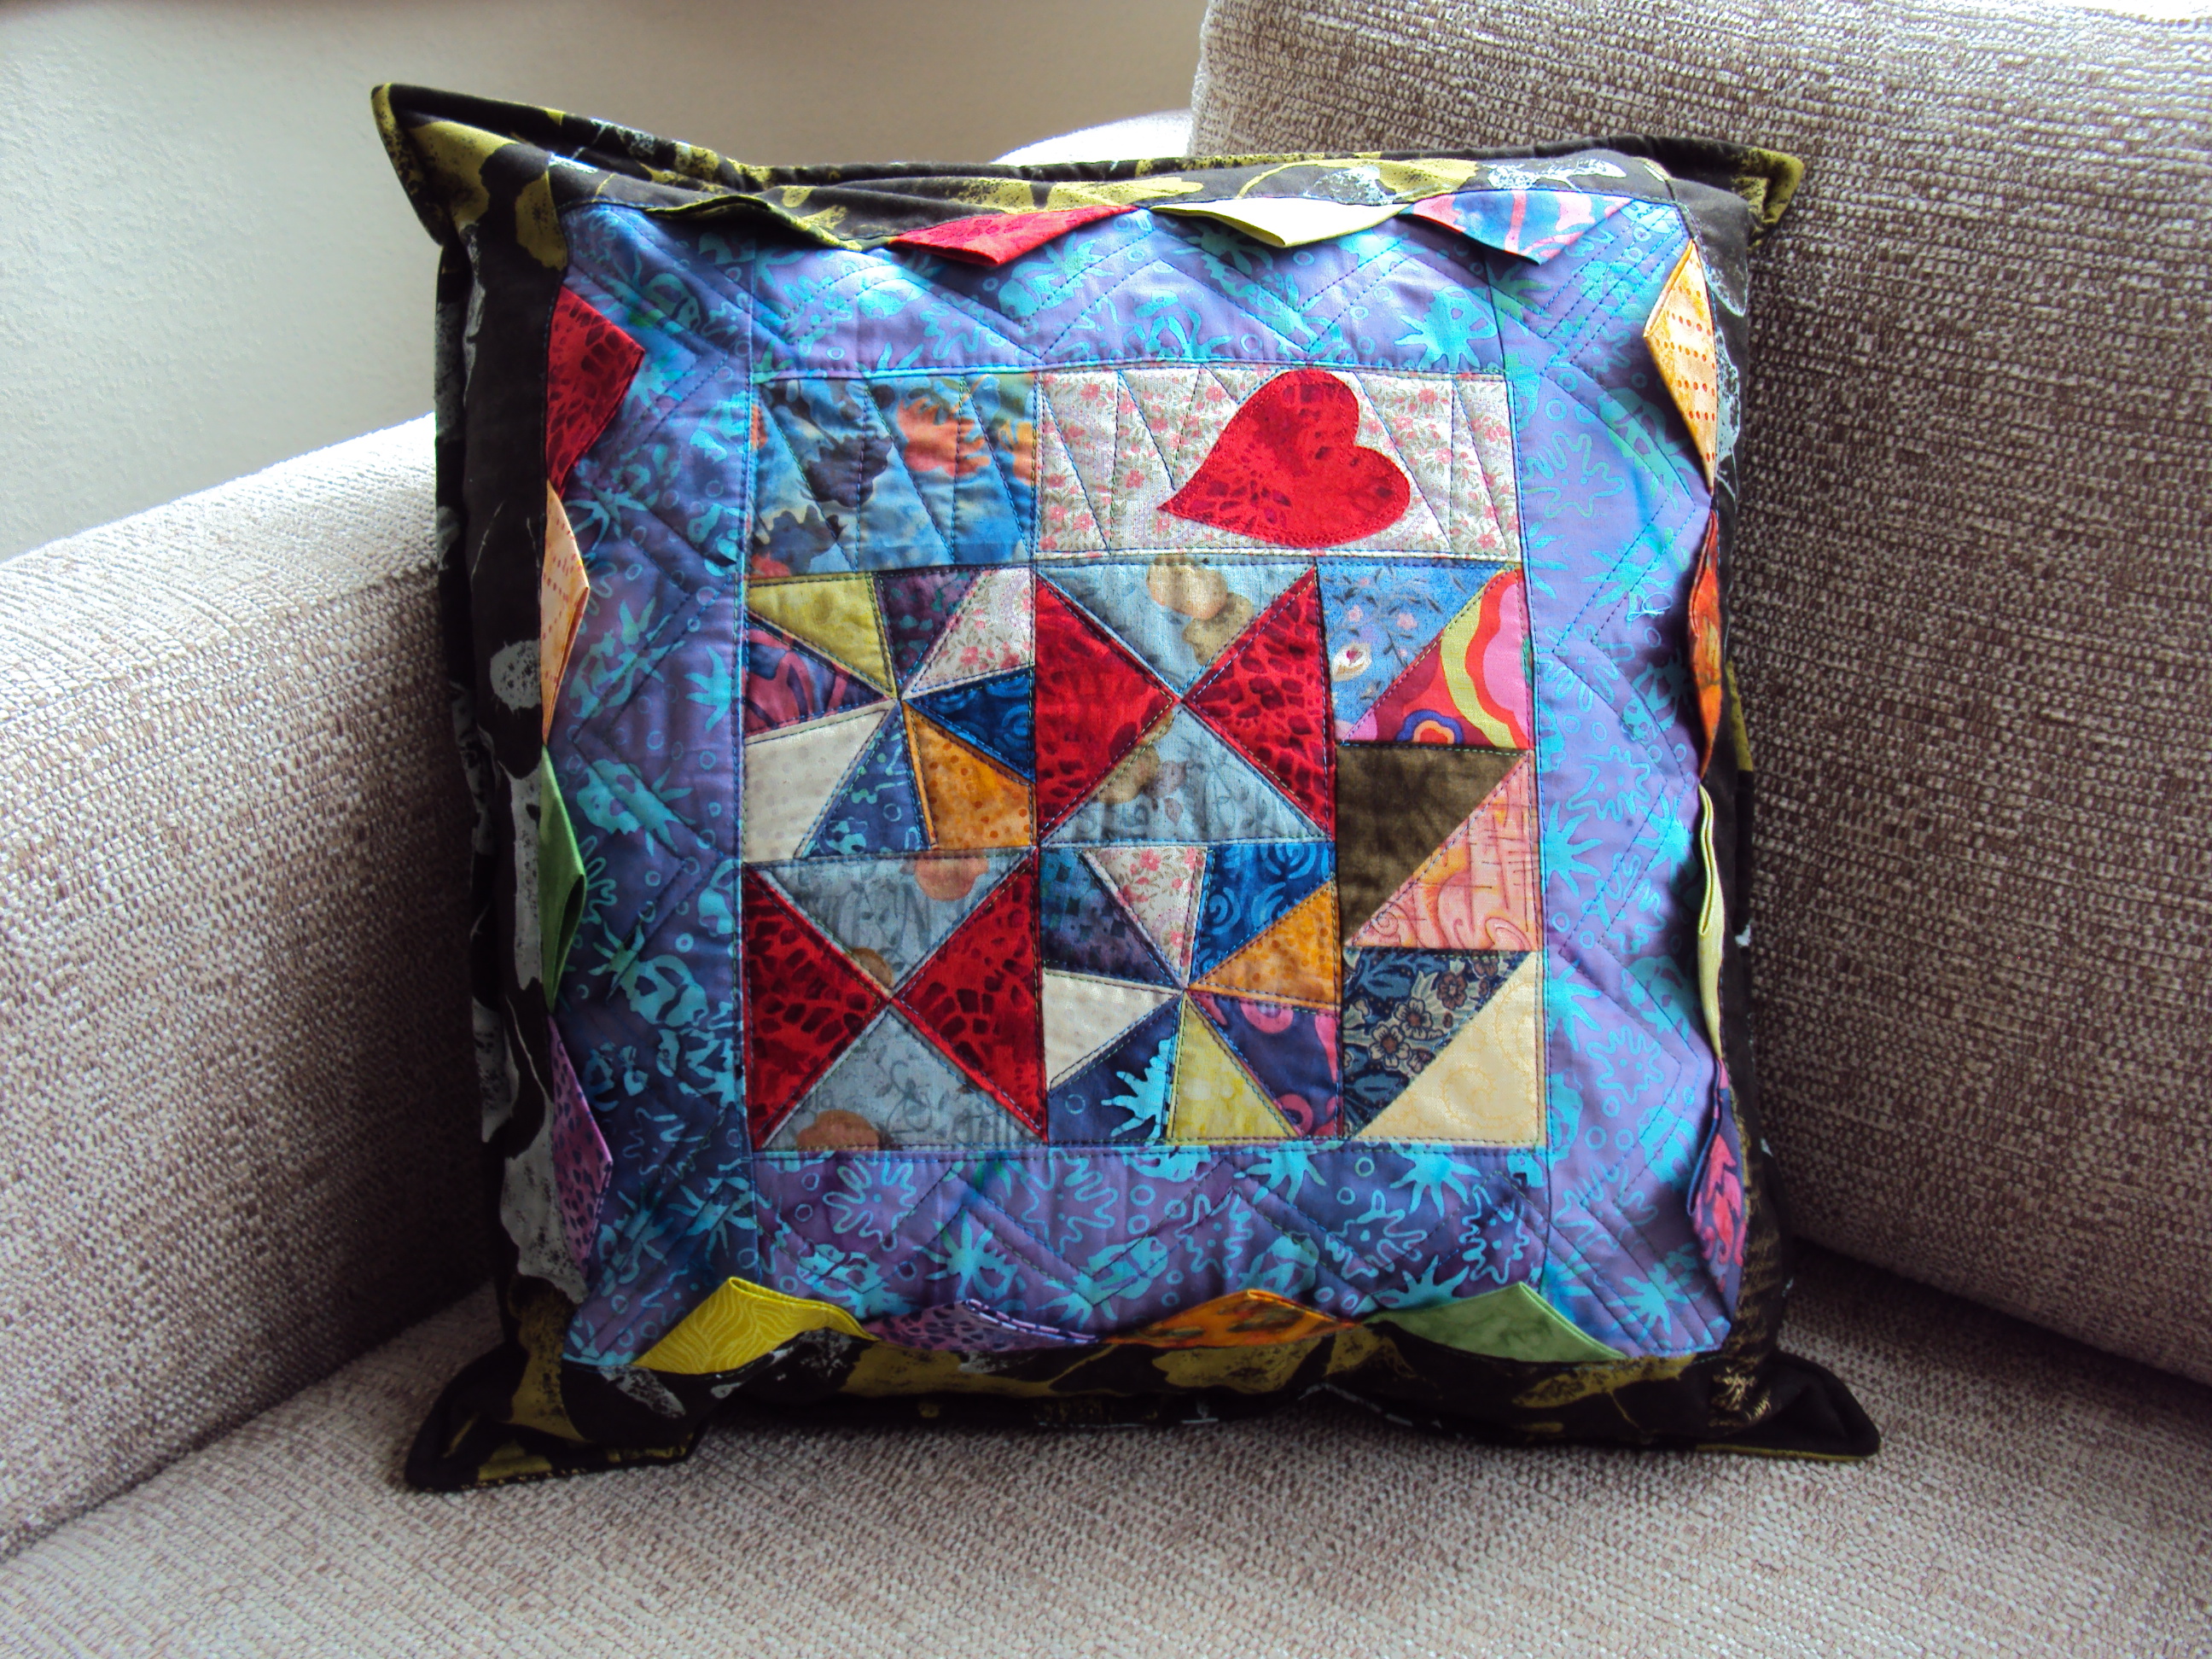
Based on the quilts ‘Stars and Scraps’ which won a first prize in its category at the Festival of Quilts at the N.E.C.
in Birmingham 2003 and featured in ‘Fabrications’ magazine, this workshop will show you how to make effective
scrap quilts from a number of simple star blocks combined with scrap fabrics. Quick piecing and rotary cutting techniques
cut out the need to use templates and speed up the production process.
Students must be familiar with the rotary cutting set and the sewing machine as this method of working
requires precision in both the cutting and the sewing of an accurate quarter inch seam.
Fabrics.
-
For the stars bring along a selection of fabrics which in your opinion will harmonise, in different values
(light, medium and dark tones) and in a selection of colours - fat or long quarters and smaller pieces.
I used mainly patterned fabric in the quilt but plain could also be included. Twelve to fifteen different fabrics in all.
Include some bright fabrics such as yellow, orange, pink, turquoise etc.
Preparation
For the triangles,if you have time before coming to the class, you can prepare some of the units as follows: Quick piece together at
least 16 pairs of half square triangle units in contrasting light / dark values. Cut each combination of the squares
4 inches, then, when the half square triangle units are pieced and pressed cut these down to exactly 3 1/2 inches square.
to make a 3 " finished unit. Use different fabrics for each unit pair i.e. 32 fabrics altogether. Using the quick piecing
method for half square triangles you will have two units of each combination.( At this stage the units should measure 3½"
which provides the seam allowance for stitching the units together thus making a 3" finished unit.) Press seams.
|
|
|
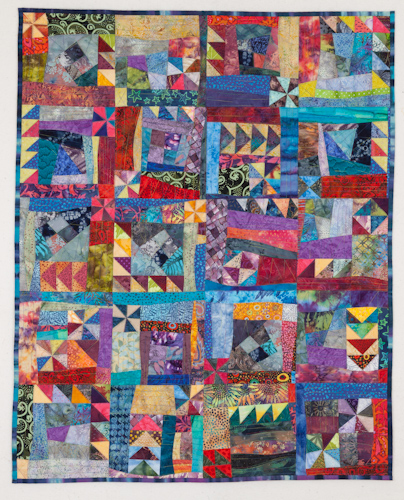
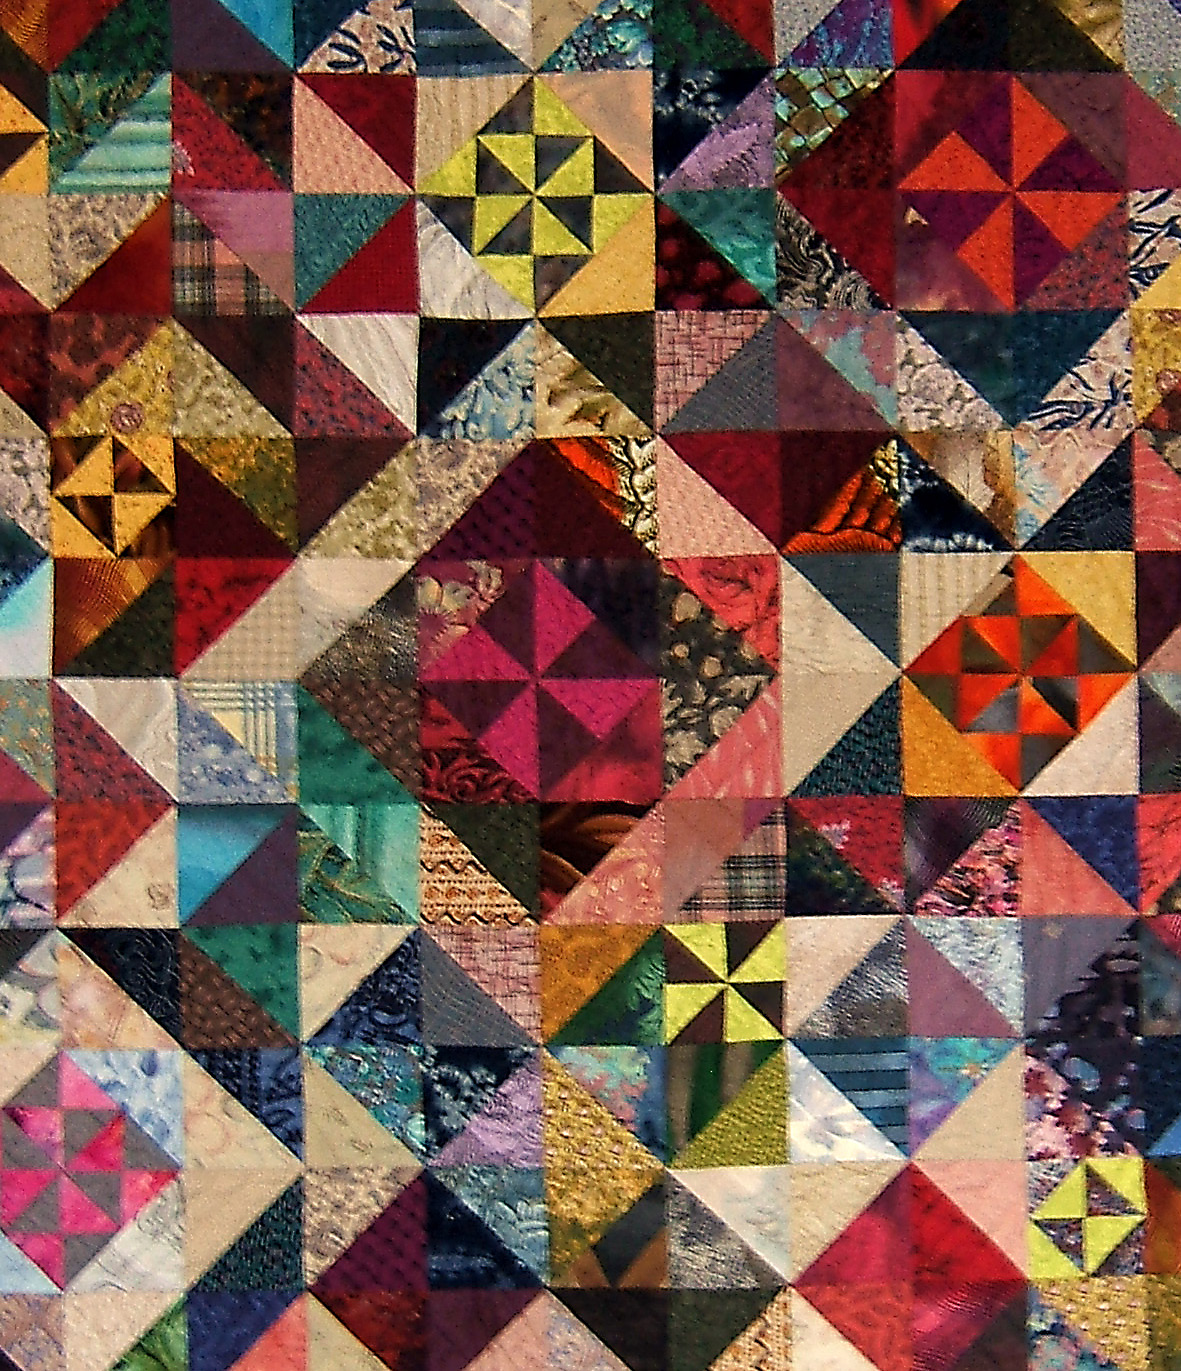
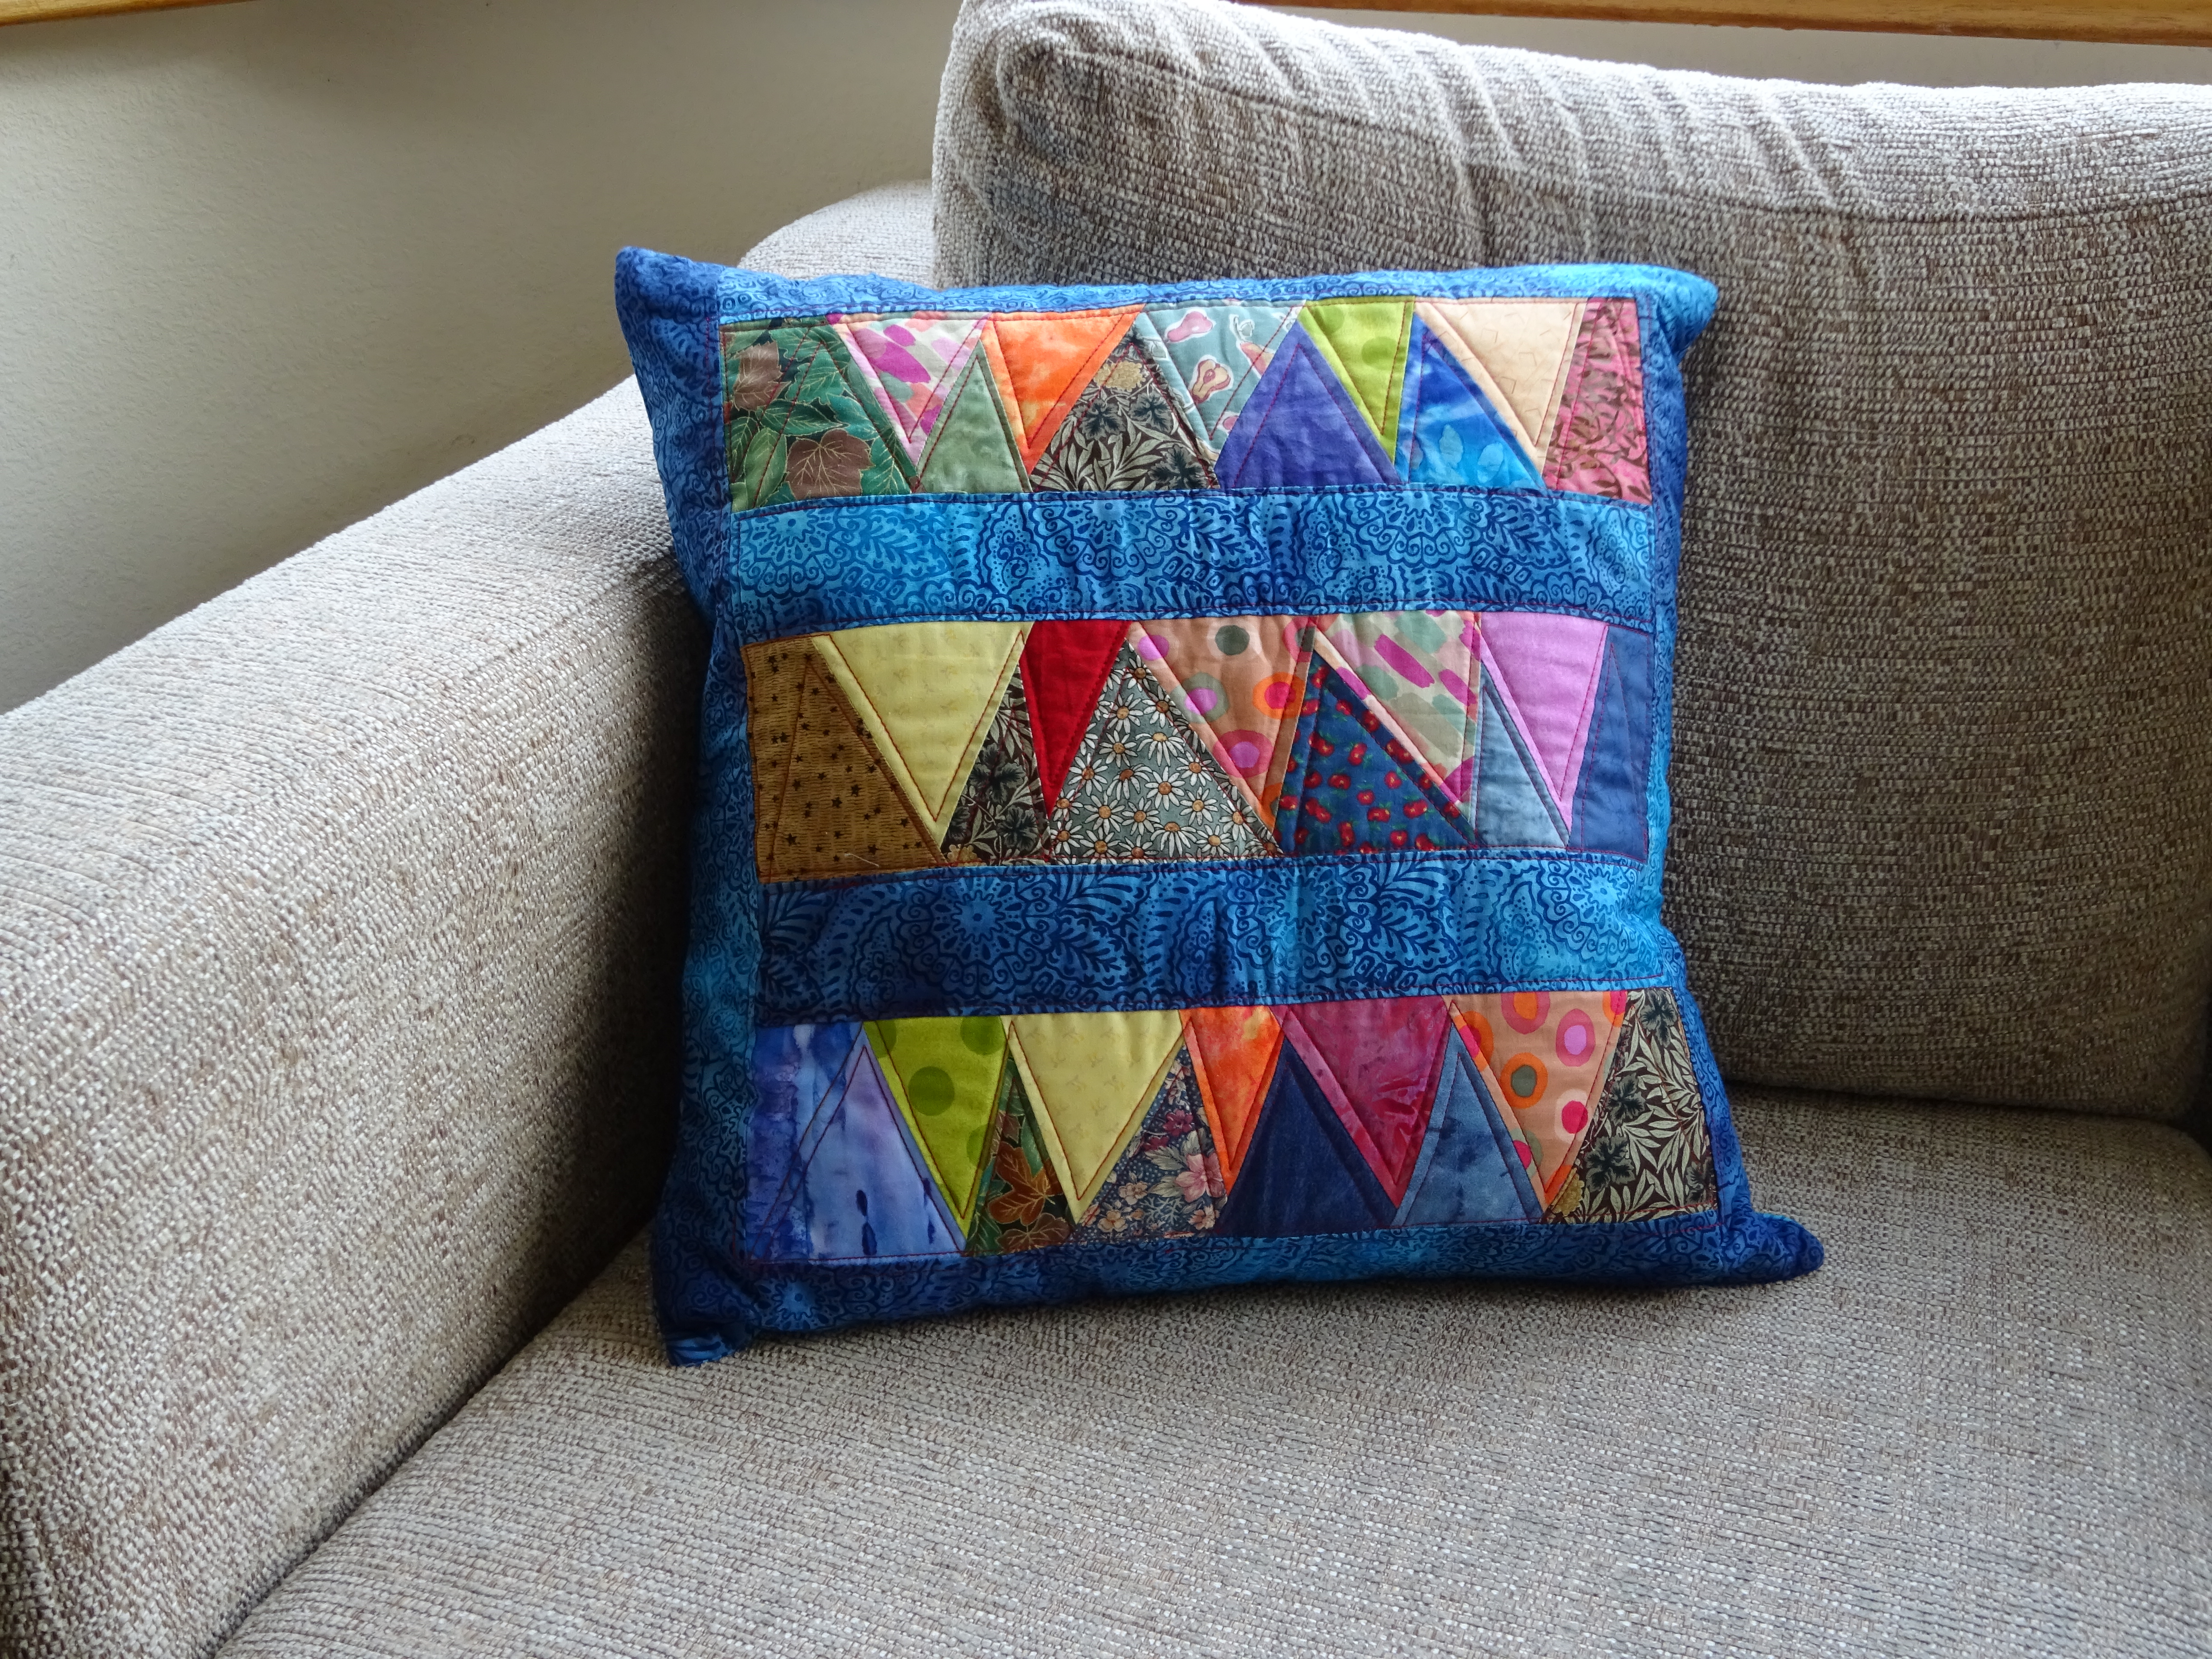
Forget 'Formula' quilts which use blocks, strips or repeating patterns. This workshop will teach you how to manipulate simple shapes using
quick piecing techniques to create a unique piece of work. Using as many fabrics as you have in your collection you will combine triangles
and squares in a variety of sizes to make a rich pattern and suface texture for your quilts. The workshop will be illustrated with examples
of the technique to inspire you but at the end of the day each piece of work created will be different. Most effective for quilts but could
be used in smaller items such as bags or cushions.
Skill level: Intermediate.
Fabrics.
Dress or patchwork weight cotton - plains, patterned, stripes, checks, spots, florals, large and small patterns. Anything larger than 4" (11cm.) squares will do. Bring as many different fabrics as you can. It is important to include dark, medium and light tonal values. You will also need some slightly larger pieces of fabric (about 6 inch square) for the focus blocks in high contrast pairs such as light/dark or bright/dark.
Include some bright fabrics such as yellow, orange, pink, turquoise etc.
Preparation
If you have time before coming to the class you can prepare some of the units as follows:
Quick piece together at least 16 pairs of half square triangle units in contrasting light / dark values.
Cut each combination of the squares 4 inches, then when the half square triangle units are stitched and pressed,
cut these down to exactly 3½" square.
Use different fabrics for each unit pair i.e. 32 fabrics altogether. Using the quick piecing method for half square
triangles you will have two units of each combination.
(The units should measure 3½" which provides the seam allowance for stitching the units together thus making a 3" finished unit.) Press seams.
|
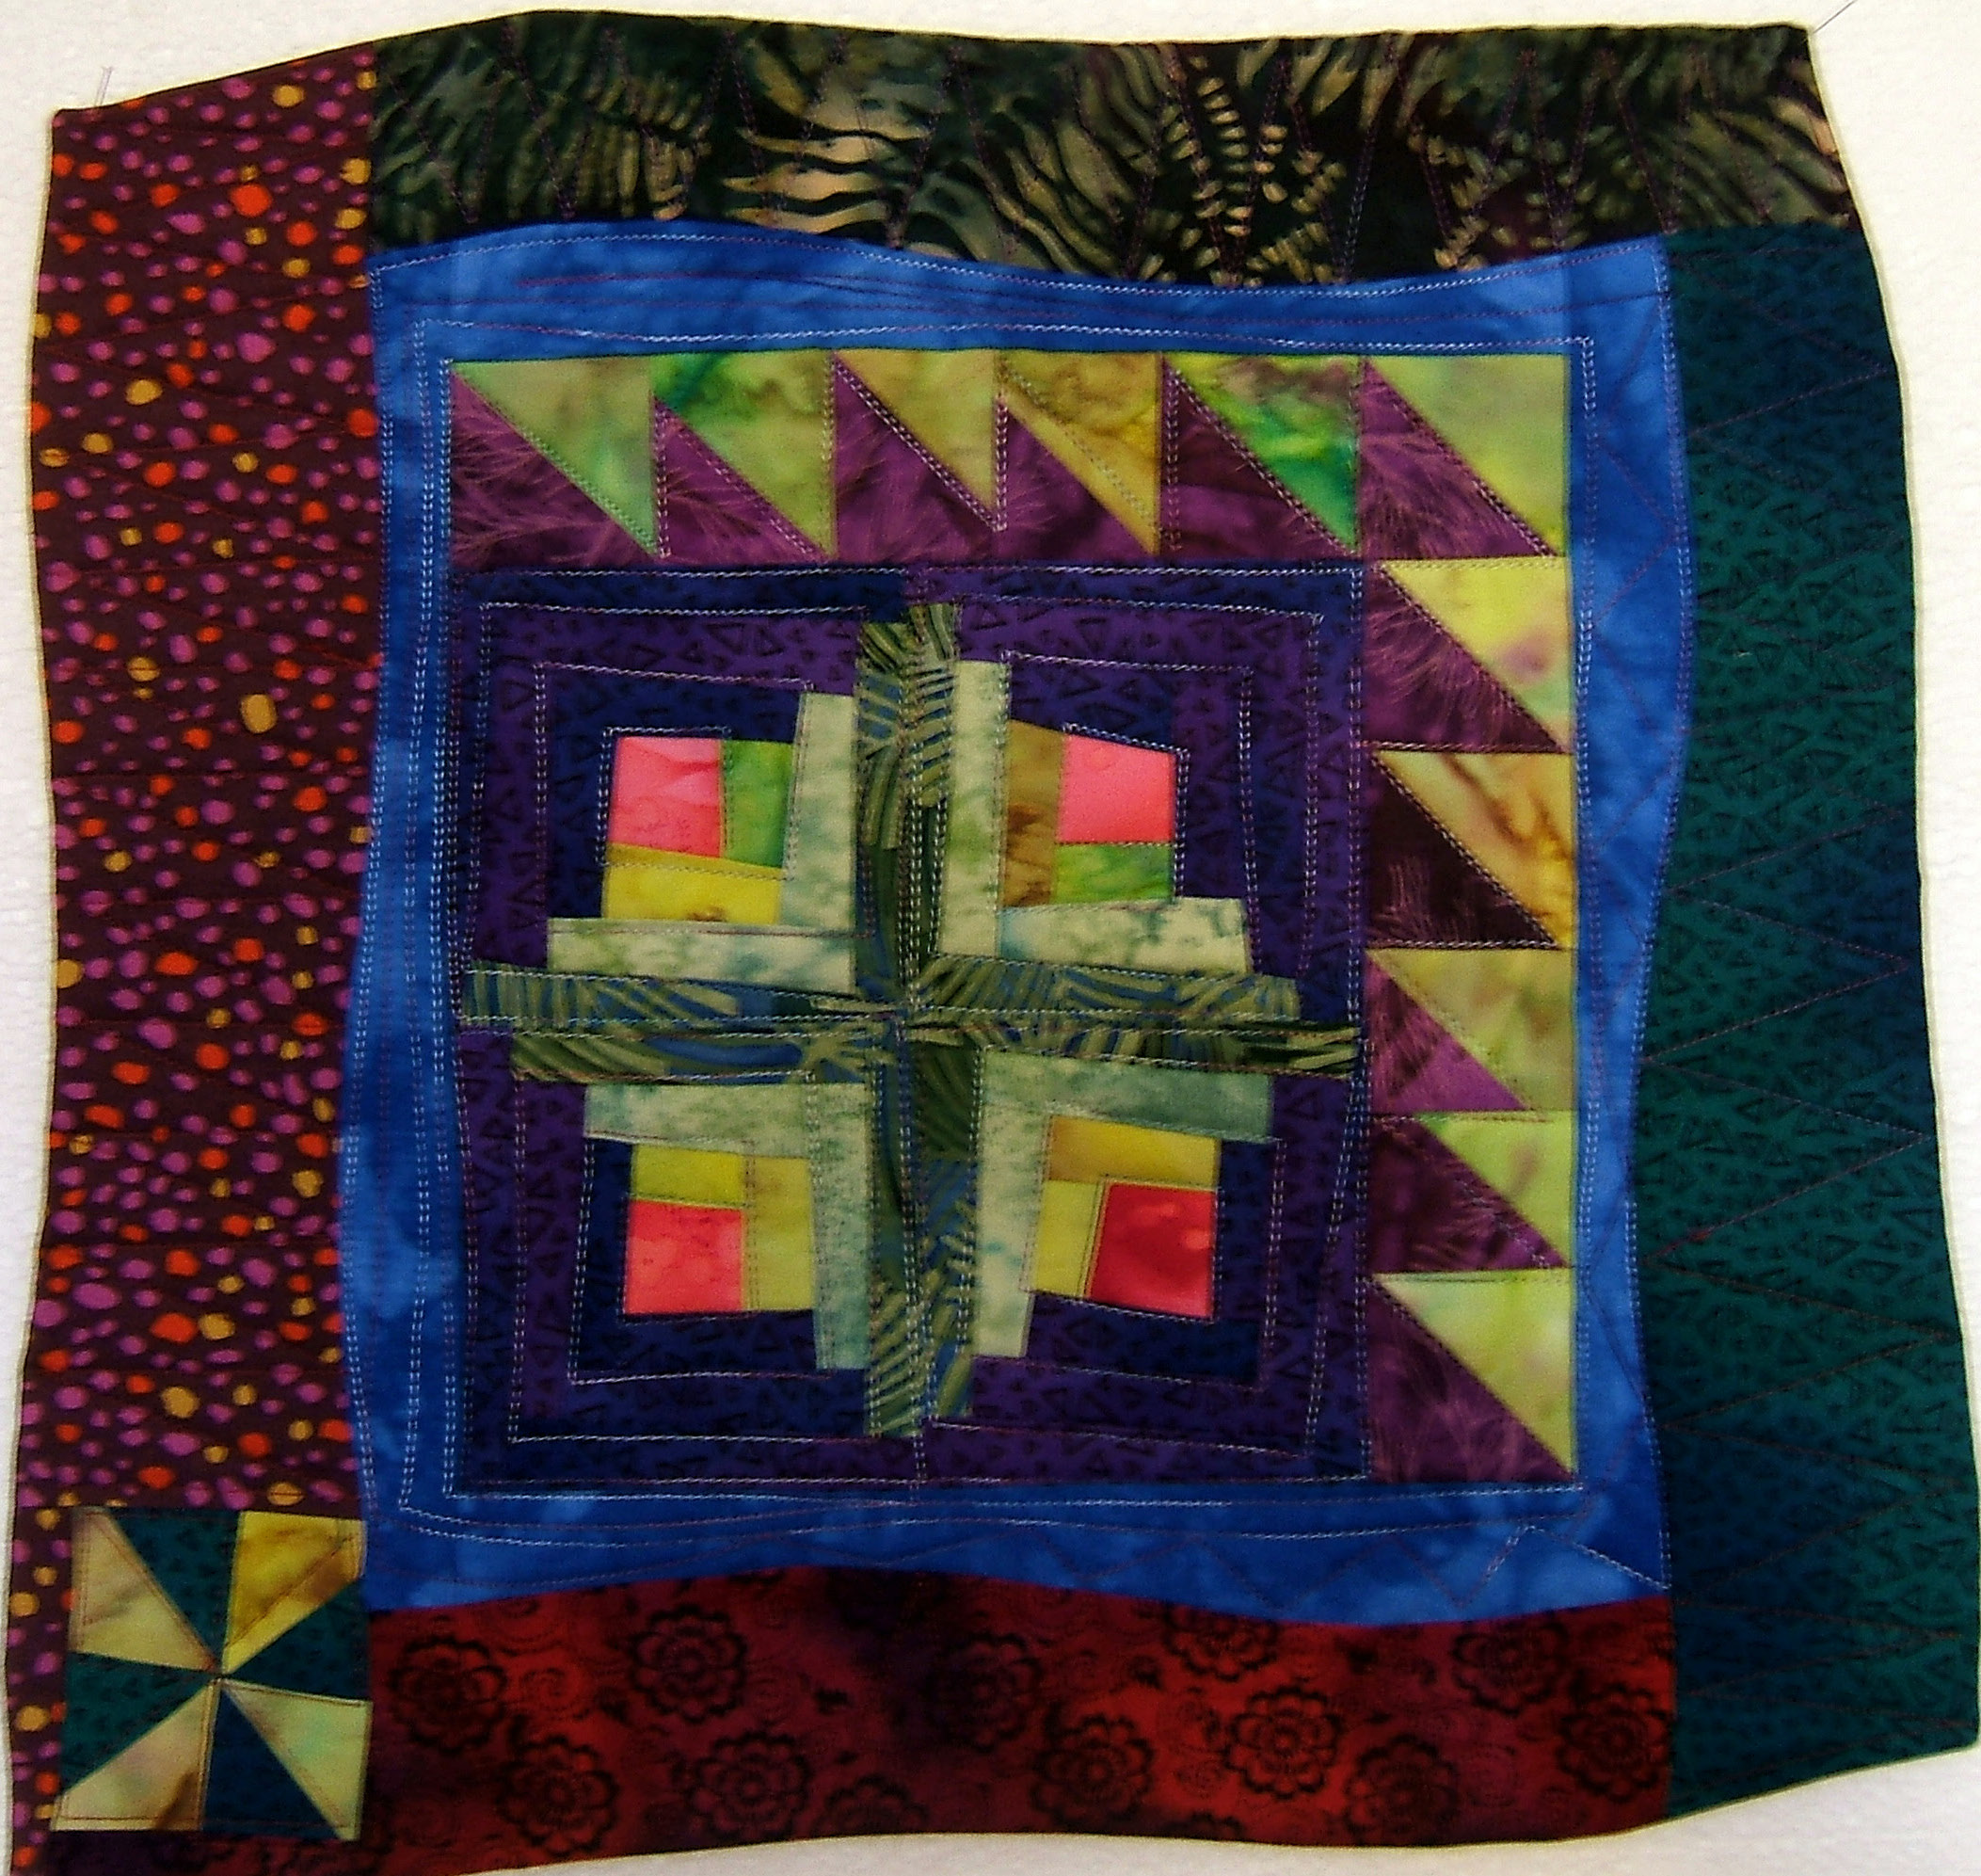
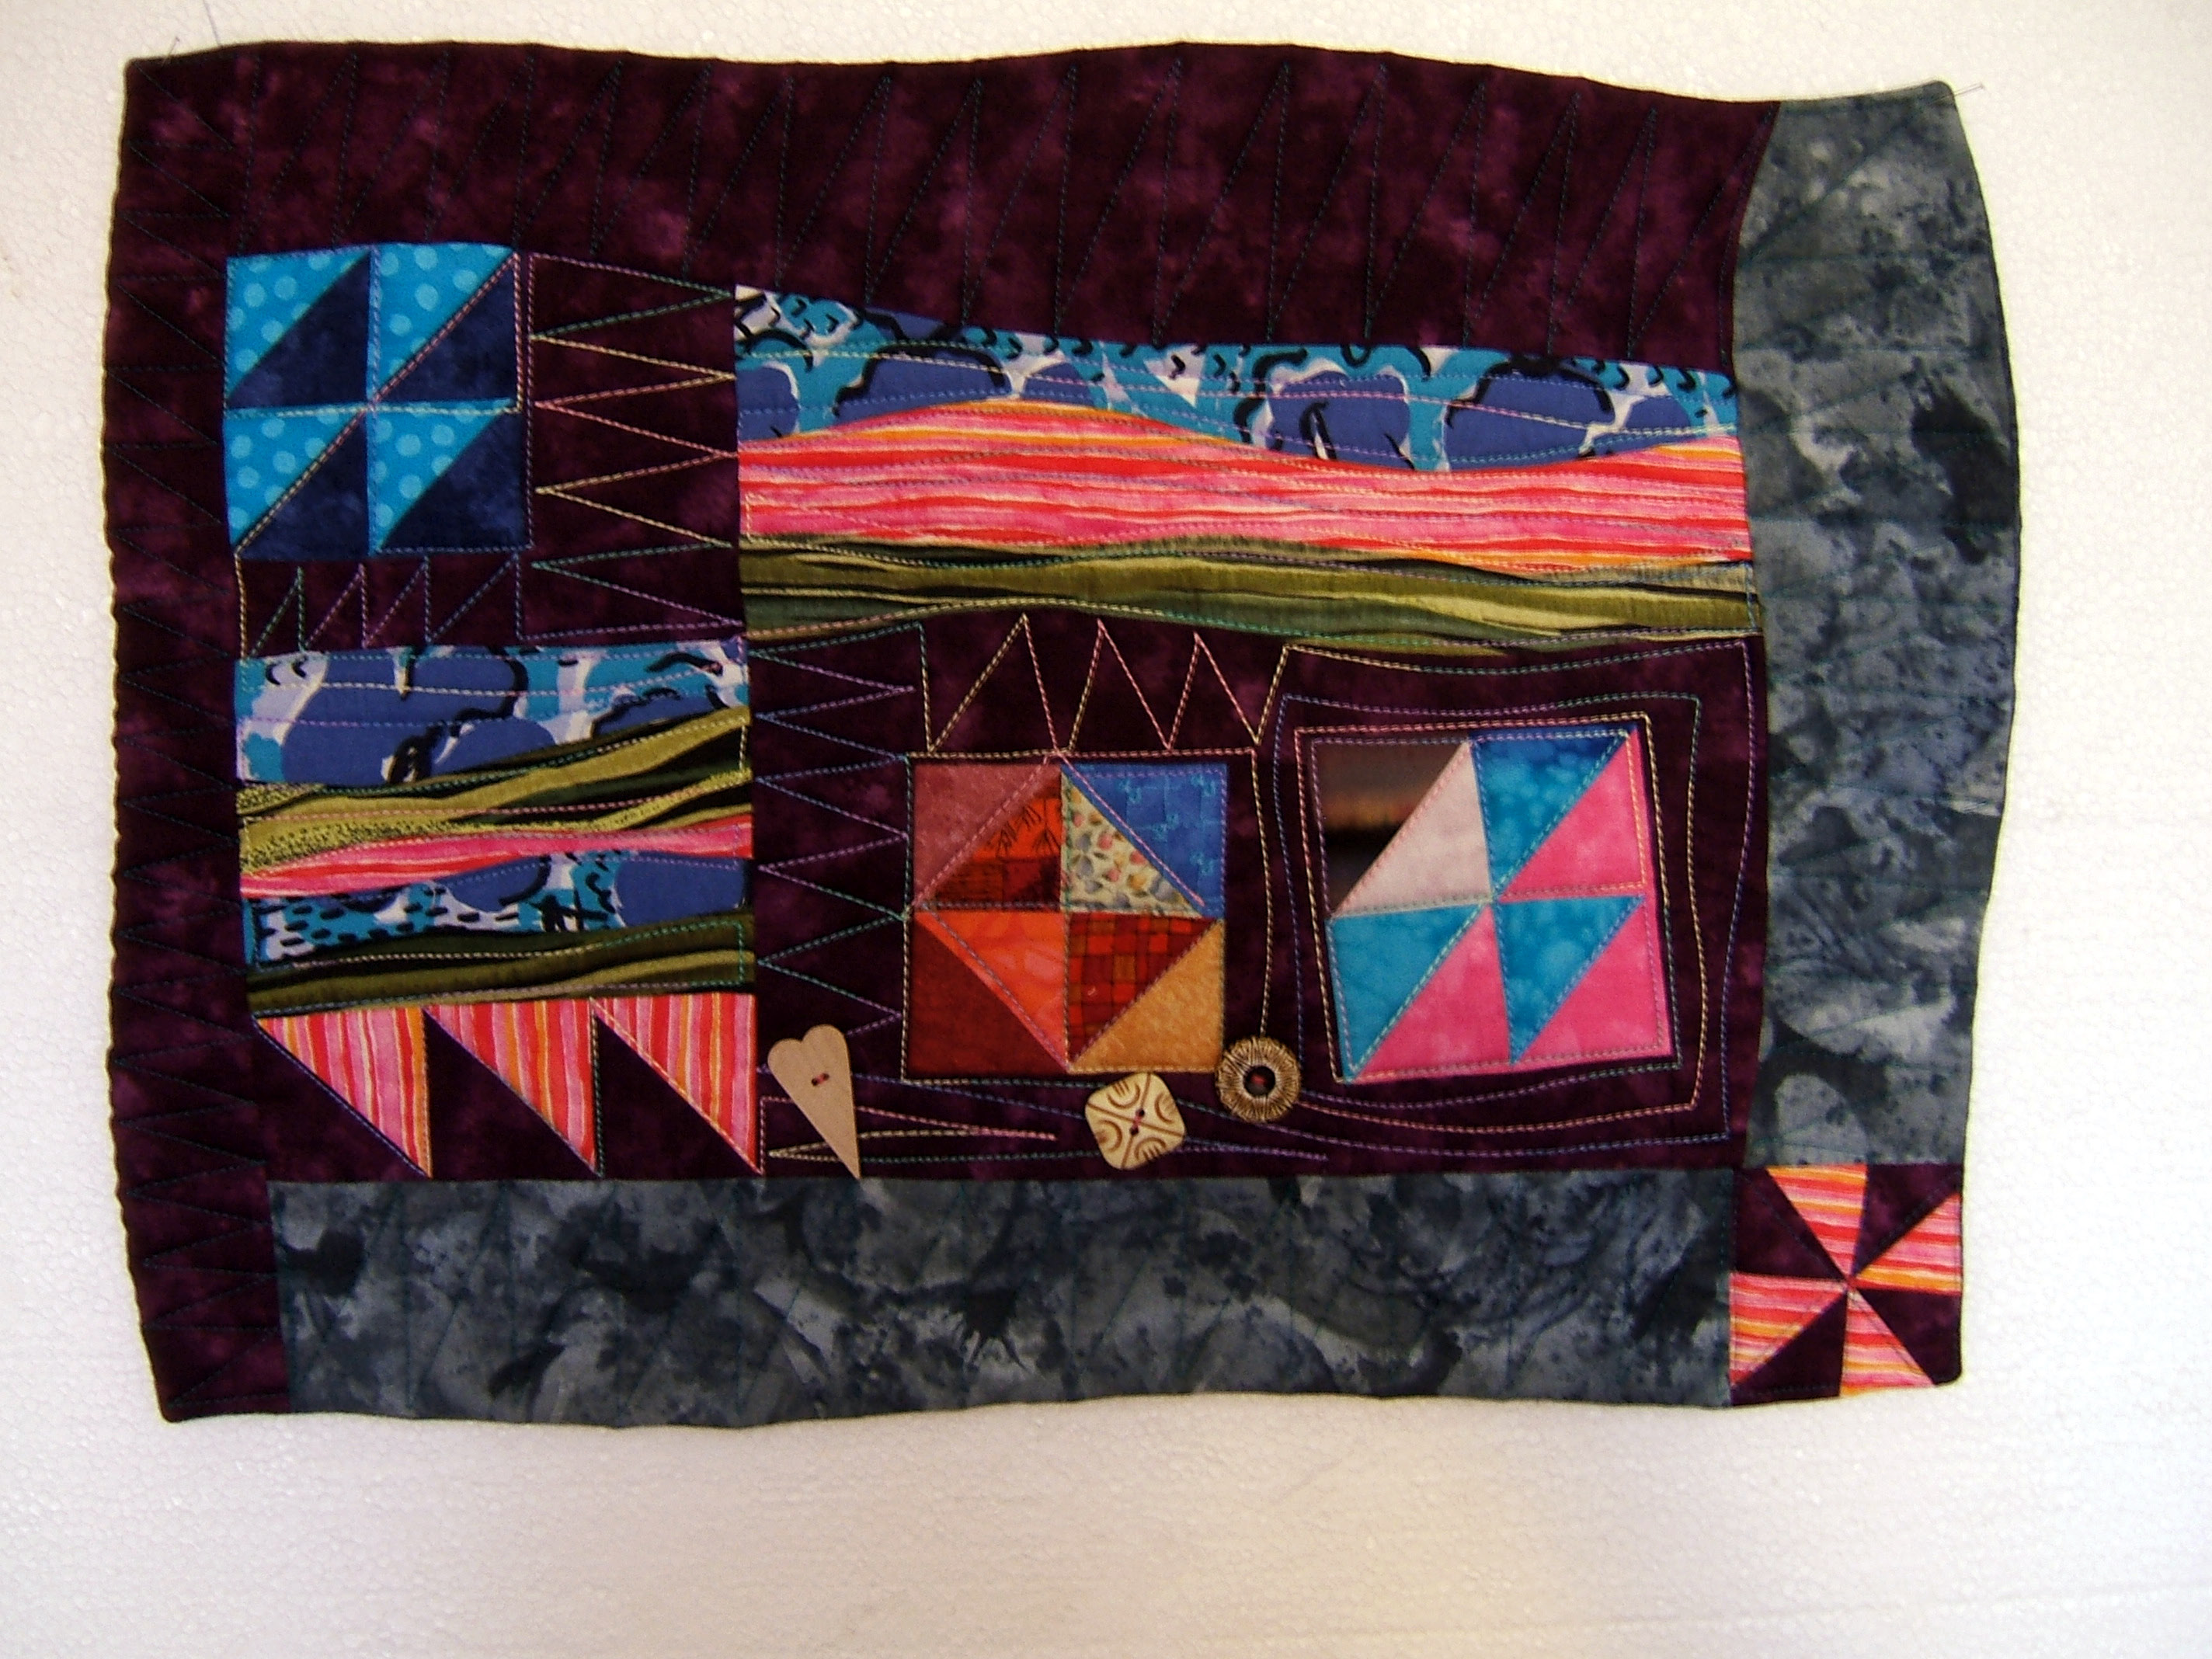
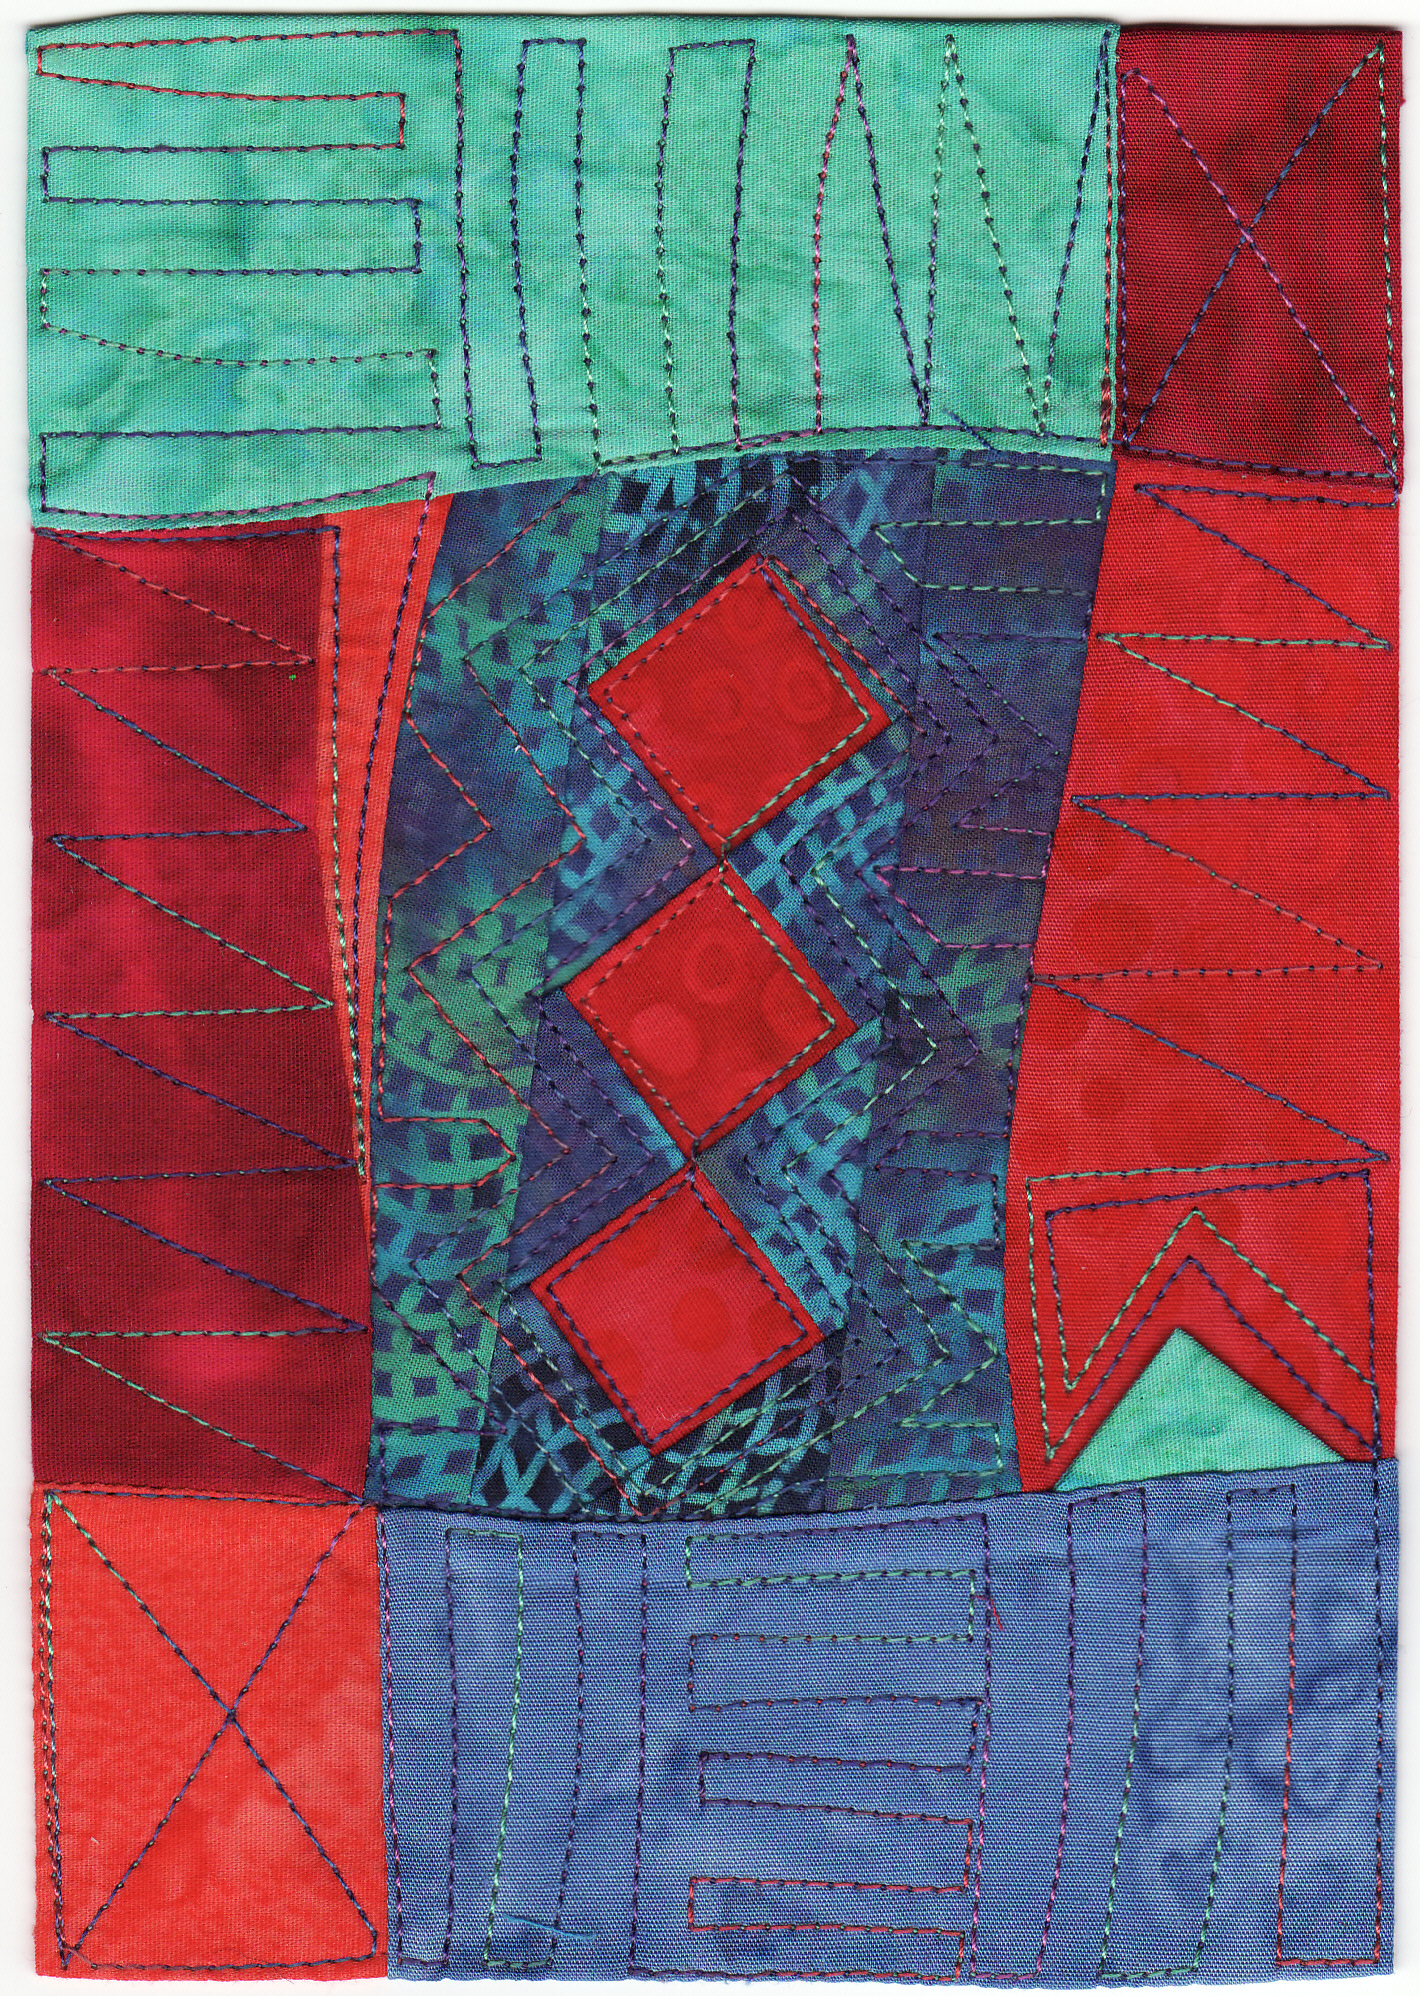
Learn a number of different techniques in a day and make a mini 'Art Quilt' to give these techniques a showcase. Because they are quick to make
and economical on fabric you can afford to be more adventurous with colour and the way you combine the different elements. The can be treated as
a 'sketch' for larger pieces or as little works of art in their own right. Inspirational samples will be there for you to study on the day and you
will be welcome to take photographs.You will learn quick piecing techniques combined with rotary cutting, no template methods of making the basic units
which are small scale half square triangles used for blocks and saw tooth sashing, joining strips with curved seams, tilted blocks, wavy borders,
prairie points and more. You will gain confidence in handling colour and combining geometric shapes. In addition it's fun, experimental and will
give you ideas to incorporate into larger pieces of work.
Additonal Requirements.
- Sewing machine. Include the quarter inch foot and the walking foot.
- Japanese flower pins (these have a flat, flower shaped end and are fairly long and sharp) if you have them. I will have some to lend out.
- Fabric marker.One of two pieces of tracing paper.
Fabrics.
-
Bring along a selection of fabrics in contrasting values and colours – fat or long quarters and smaller pieces
including brights,
contemporary patterned (i.e geometric, marbled textured, stripes etc) plus some larger pieces for borders and backing.
About 12 – 15 different fabrics altogether.
- Backing fabric should be about 30 in. square.Low loft wadding a piece about 30 in. square.
- If you have any UFO blocks or small bits of patchwork left over from previous projects (6 in. blocks or smaller pieces) bring them
along as well – it's possible you may be able to incorporate them into your piece.
|
|
|
Snail Trail is an intriguing block which relies for its effect on the correct placement of dark and light fabrics.
Although the design gives the illusion of curves all the seams are straight making it fairly simple to construct in
any size using the technique of foundation piecing.Once the blocks are made
there are a number of ways to put them together giving a variety of options for the finished quilt. Snail trail blocks
can also be used for smaller items such as cushions or bags if you don’t want to embark on another major project.
Additional Requirments.
- ‘Sew in’ vilene (not iron on) or stitch and tear for foundation material about half a metre.
Fabrics
- Scraps in light and dark tonal values or you can combine bright colours with black.
Bring along a number of harmonising fabrics that you will enjoy working with - fat quarters or smaller
pieces can be used.
|
Learn to manage composition with shapes and colours on a miniature scale of 6½" x 4½"
Piecing techniques include curved seams, strips and prairie points. Each 'postcard' is interlined with 'stitch 'n' tear',
backed with handmade paper, then machine quilted ready to frame or mount onto a small canvas. A miniature 'Art Quilt'.
They are also ideal for individual greetings cards. In a one day workshop you will have time to make several finished
postcards to explore the principles of abstract shapes, line, form and colour. Another option is to make a
'Pinboard Quilt' a small quilt using similar techniques which is finished with wadding and quilted by machine.
Lots of samples to inspire you on the day.
Additional Requirements.
- sewing machine with the quarter inch foot if possible.
- Fine pins. One or two sheet of A4 tracing paper.
Fabrics.
About half a metre of Stitch ‘n’ Tear and Half a metre of Bondaweb.
Small pieces of fabric in bright colours in the marbled batiks, Moda marbles (or similar) or hand dyed.
If you want to work with patterned fabrics, small scale prints are better as these will fit into the scale
you will be working on. Choose fabrics with a fairly high thread count (In other words not loosely woven,
the batiks are good for this) Quarters or smaller pieces will be sufficient: about 6 - 7 different colours minimum
in a variety of values.
A sheet of hand made paper, available from Art shops, or I can supply pieces.
Machine quilting thread in variegated colours to go with your fabrics.
For the Pinboard Quilt you will need a piece of wadding about 15" Square and a square of backing fabric the same size.
Small bits of embroidery or interesting fabrics such those printed with motifs can be incorporated in these quilts,
so if you have anything like this bring it along.
|
|
|
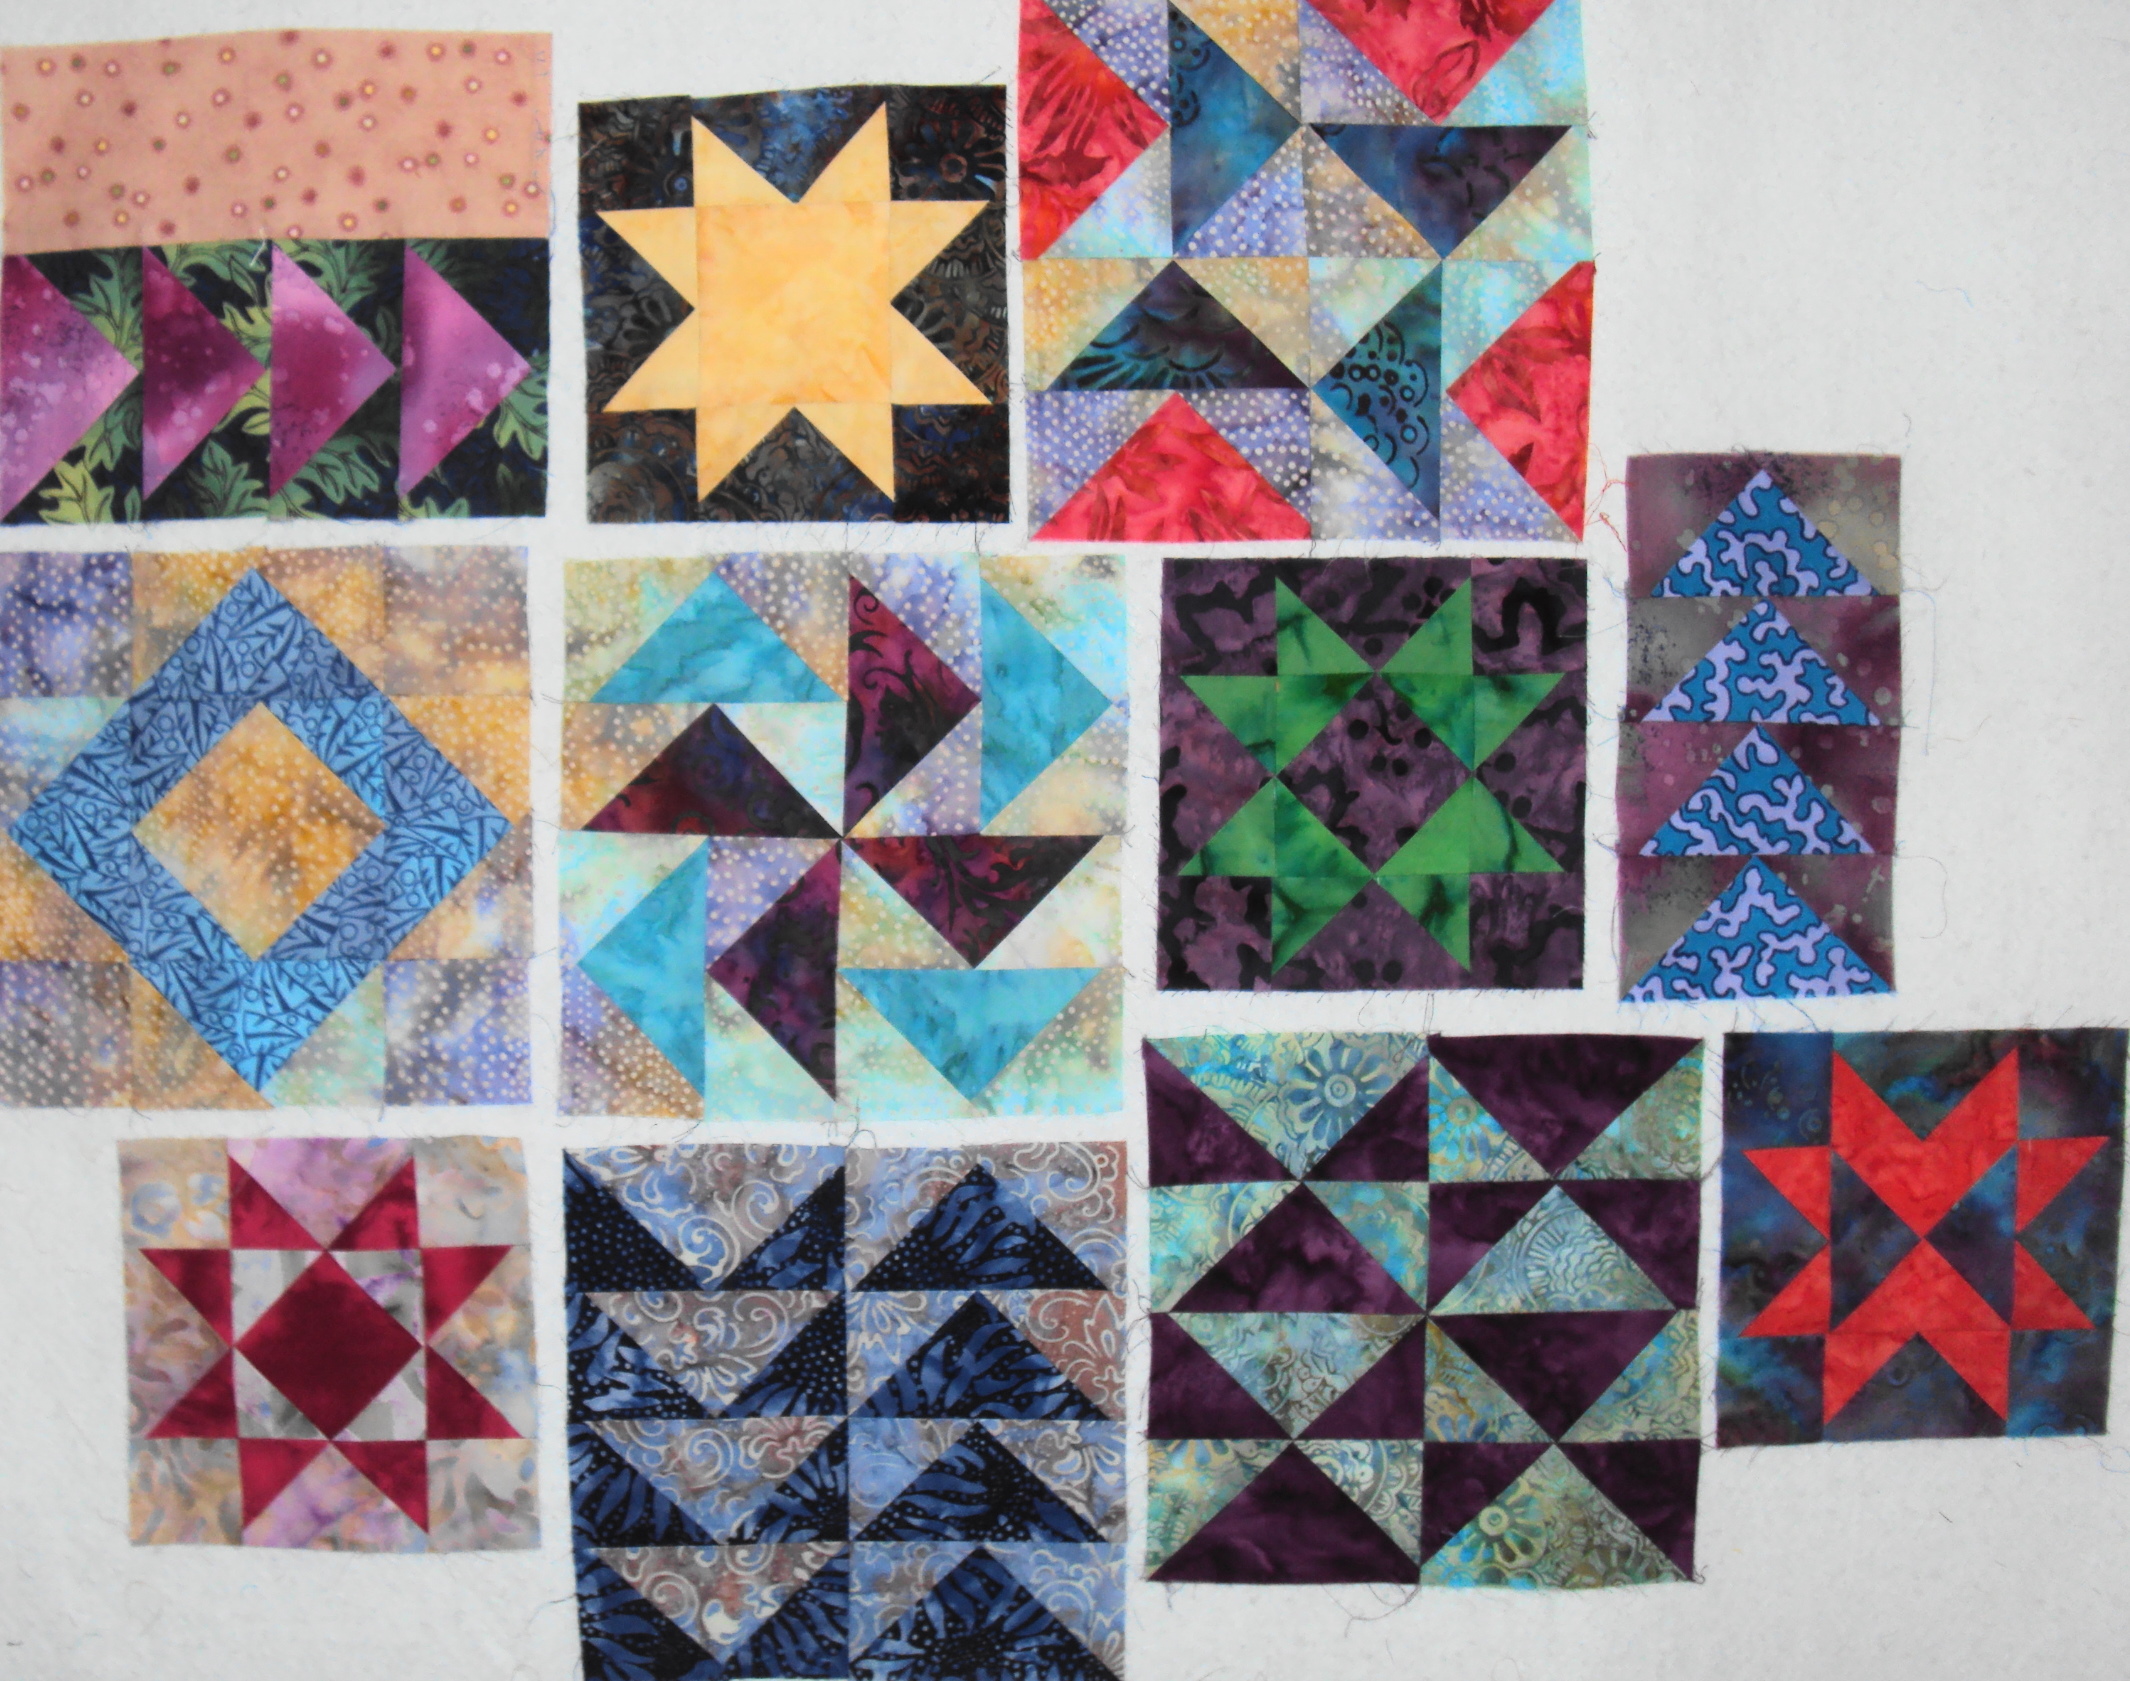
Learn a quick method of making the Flying Geese blocks and then make a selection of blocks using this unit which is made of triangles in two sizes. ‘Dutchman’s Puzzle’, ‘Eight Pointed Star’ and a ‘Sophisticated Pinwheel’ as well as Flying Geese itself are all possible in a short time. Very versatile for blocks, borders, sampler quilts and more. Lots of samples to inspire you. All skill levels.
Sewing machine required.
Additional Requirements
- Sewing machine with quarter inch foot if possible, or can be hand stitched but this is slower.
- A few pieces of plain paper.(A4 size.)
Fabrics.
-
between six and eight different fabrics minimum, in a variety of values - light, medium and dark.
Small pieces will be sufficient, quarters, eighths or scraps for making up samples.
|
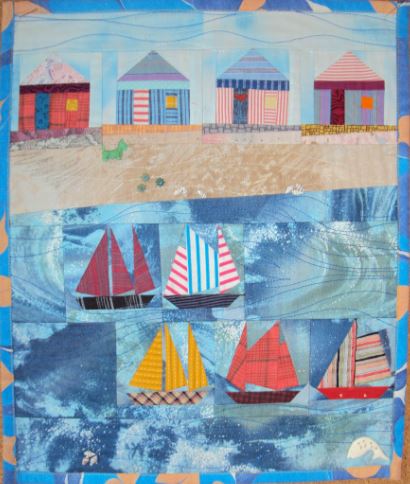
In this workshop students will learn how to piece miniature patchwork blocks on a seaside theme.
Beach huts, sailing boats, fish and a lighthouse. using the foundation piecing method.
This involves stitching the patches onto a lightweight foundation fabric onto which the design has
been traced from the patterns provided. Blocks are approximately 3 inches square. Blocks can be used to make an individual greetings card or as the beginning of a small wall hanging, cushion or bag. There will be a collection of miniature quilts to study as examples which you are welcome to photograph.
Additional Requirements.
- For the foundation: about half a metre of either sew in vilene or stitch 'n' tear
Fabrics
-
small print fabrics; dots, stripes, small floral prints, geometrics etc,
in a variety of colours to suit the theme, plus some fabric (fat quarters) to represent sea, sky and sand.
|
|
|
.
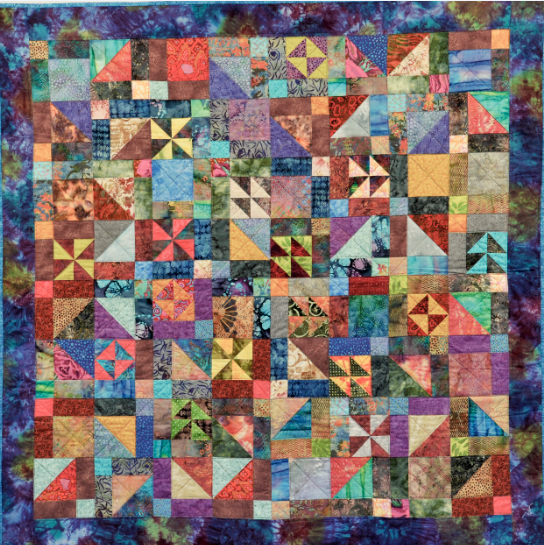
Using this ingenious method to create a complex seeming pattern in patchwork is actually quite easy.
Nine patch blocks in two different designs are first made, then cut and re-assembled. Basic rotary cutting skills
and the ability to sew a ¼" seam plus a collection of fabrics are all that is required. In addition to basic
skills students will learn the quick piecing methods to speed up construction, advice on fabric choices and
colour selection. In one day it should be possible to create enough blocks to start a quilt,which can be made any size.
Fabrics.
-
In dress or patchwork weight cotton - plains, patterned, stripes , checks, spots, florals, large and small patterns.
Anything larger than 6" (15 cm.) squares will do. Bring as many different fabrics as you can. It is important
to bring dark, medium and light tonal values. You will also need some slightly larger pieces about 8"(20 cm.) squares of fabric for
the focus blocks in high contrast pairs such as light/dark or bright/dark. Include some bright fabrics such as yellow, orange, pink,
turquoise etc.
|
Learn a number of patchwork techniques and make a panel suitable for a cushion cover, small wallhanging or tablemat from your scrap bag.
Techniques covered will include half and quarter square triangles, raw edge applique using 'Bondaweb,' prairie points and finishing techniques to complete the project.
Easy to master methods which can be adapted to other patchwork projects.
If you don't have lots of scraps then just choose a colour range to make your panel.
Tips on colour selection, choice of fabrics, quick piecing and rotary cutting all included in the day..
Fabrics.
-
Small pieces of fabric in a number of different patterns, colours and values: 4 inches square or larger for the scrap panel and prairie points.
Inner border for the cushion: one long quarter.
Outer border and back for the cushion: ½ metre.
Fleece: a piece 22 inches square or, wadding and backing 22 inch square pieces.
Curtain lining or sheeting to line the back of the cushion: 22 x 20 inches.
16 inch zip.
Quilting thread. If you prefer to make your panel into a small quilt or tablemat,
bring fabric for a border and the wadding and backing, plus binding, about a quarter metre of each.
|
|
|
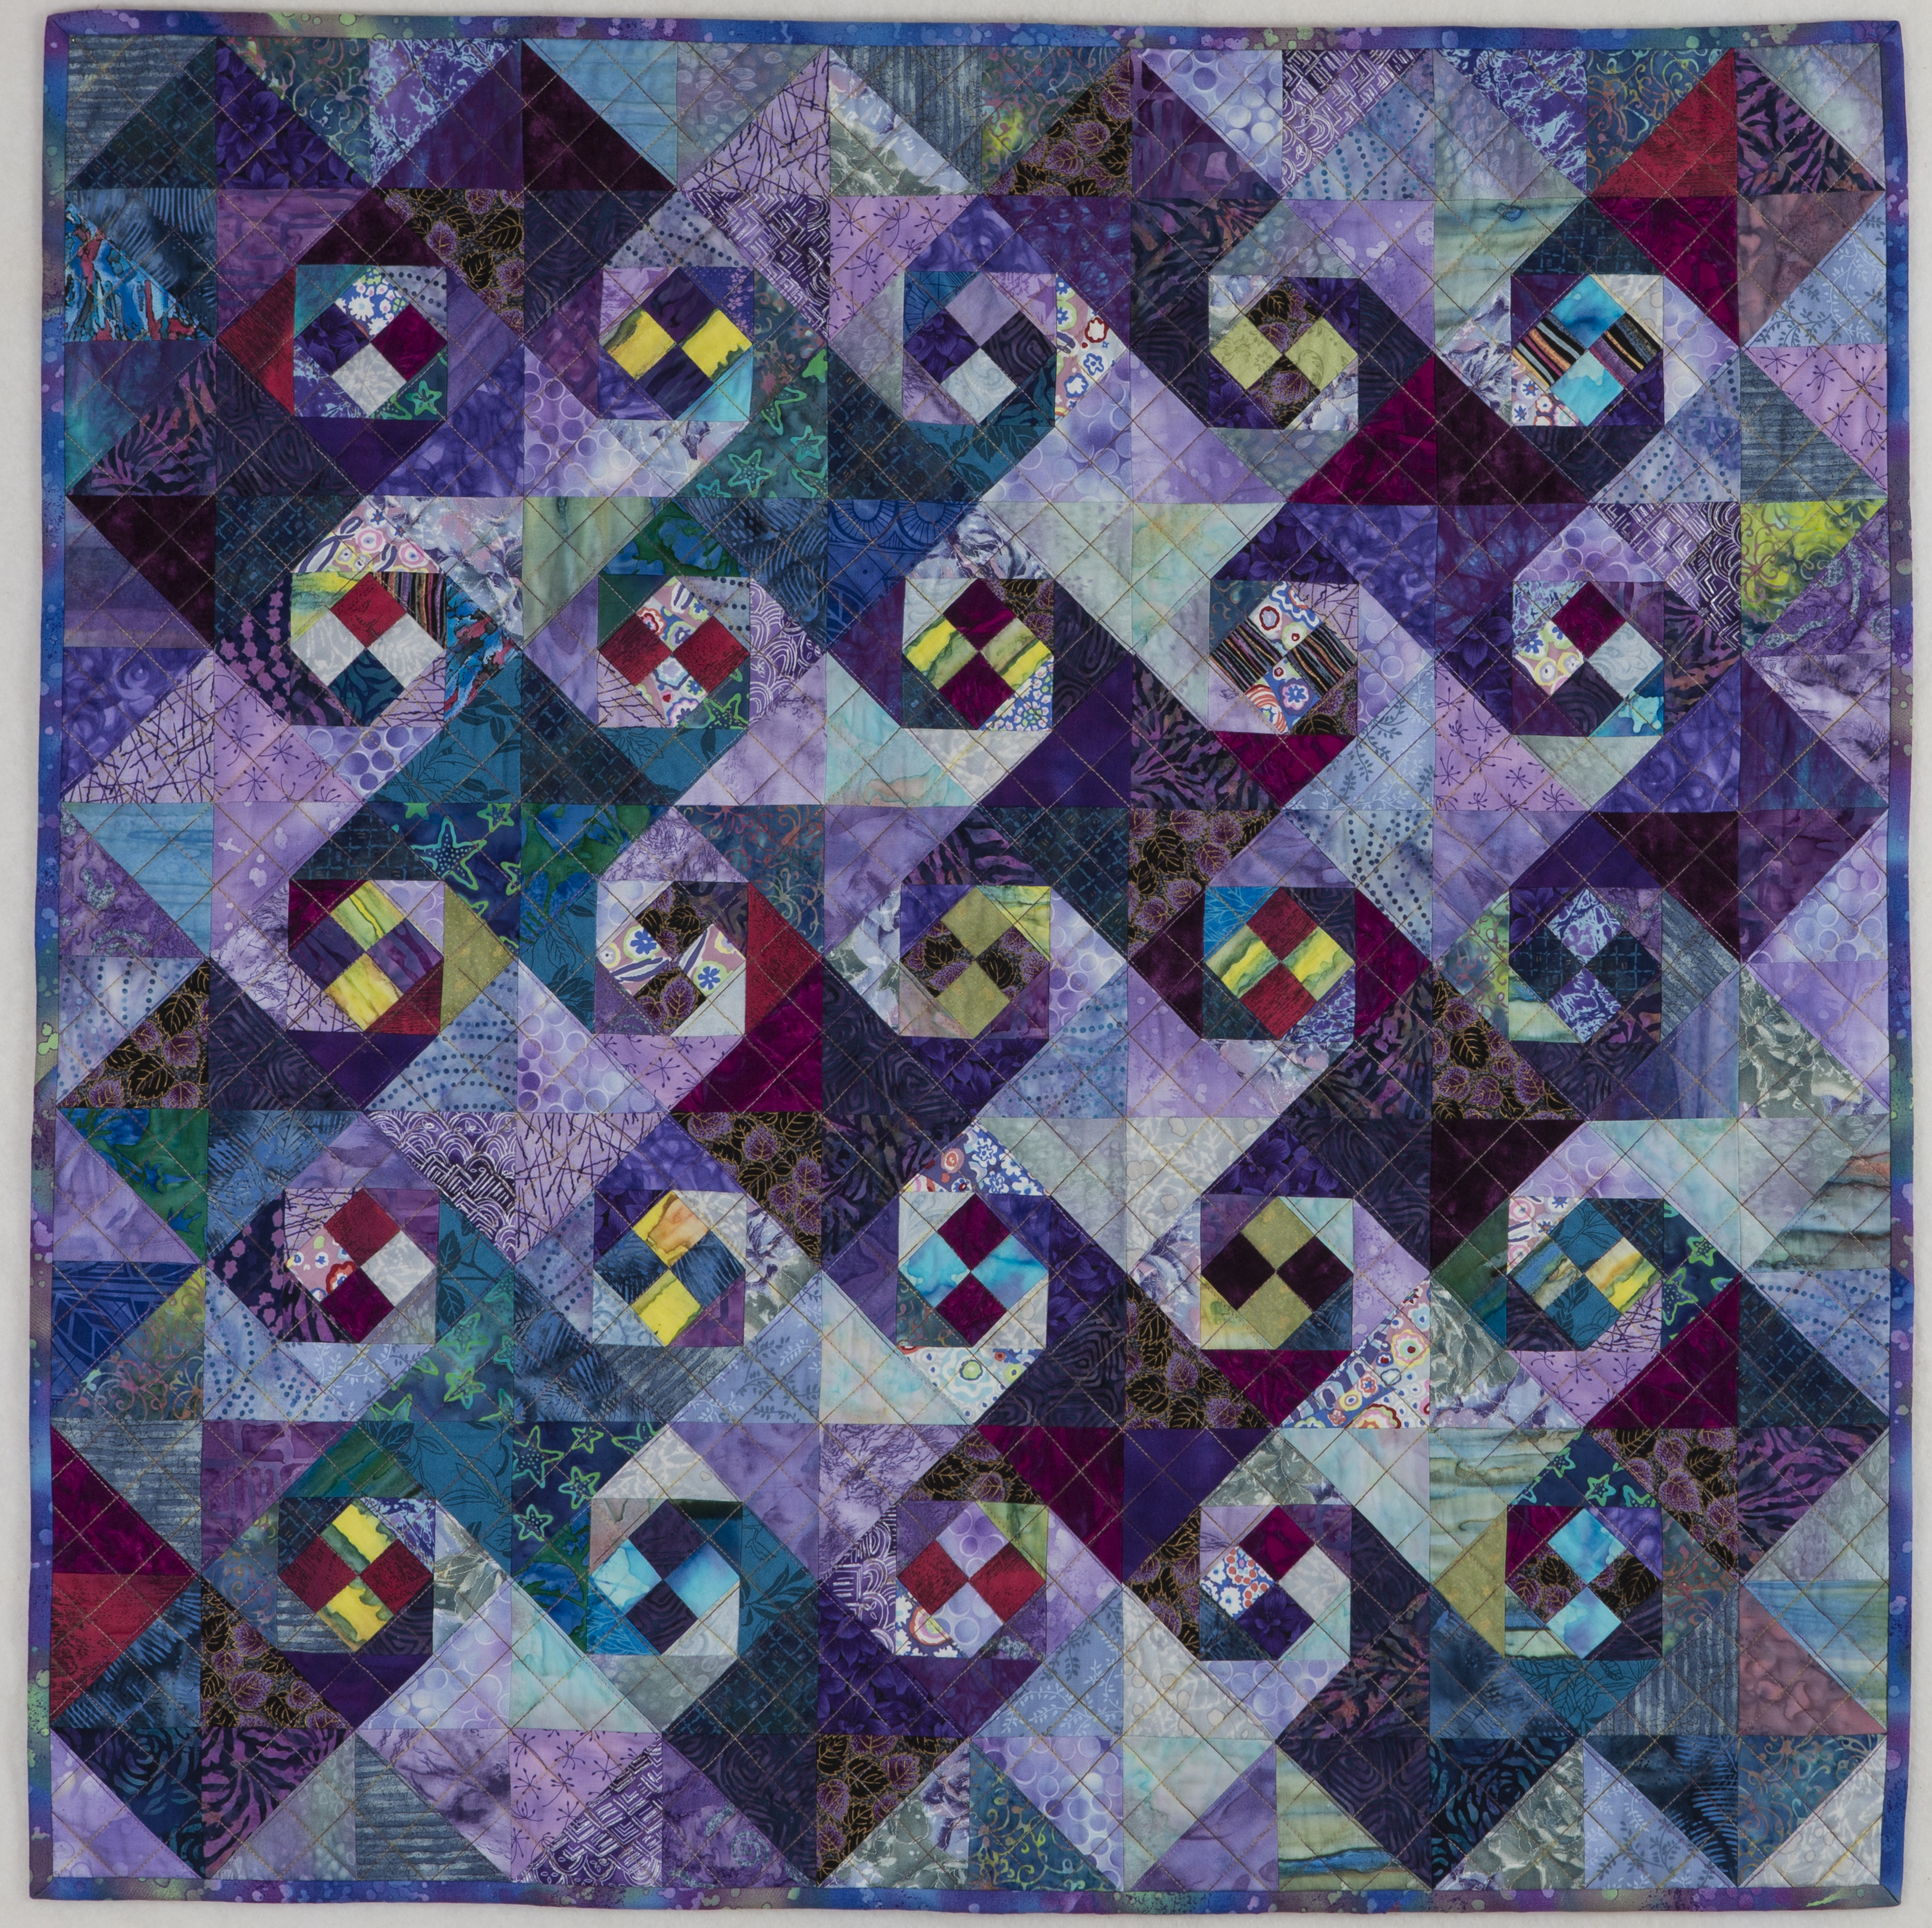
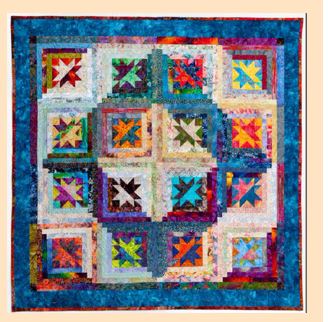
By dividing Star Blocks diagonally into a dark and light side,
then adding Log Cabin strips to frame them the resulting blocks will
make an interesting quilt when arranged into the 'Barn Raising' set.
Blocks can be made from your scrap bag, or if you prefer a more
organised effect you can create a colour theme to match your decor.
In one day you will learn the necessary techniques to make the
blocks and start a quilt. Tips on rotary cutting and quick piecing and
advice on colour selection will be included in the course.
Fabrics.
-
In dress or patchwork weight cotton: plains, patterns, stripes, checks,
spots, florals.Fat quarters and smaller pieces. Bring approximately between
eight and fifteen different fabrics to work with, or more if you prefer.
It is important to include dark,medium and light tonal values.
Include some bright fabrics such as yellow, orange, pink, turquoise, etc.
Alternatively you could choose a clolour theme of fabrics which in your opinion
will harmonise but still with a variety of tonal values- dark, medium and light.
Furnishing fabrics are not suitable for patchwork as they are too thick for
the number of seams created.
|
|
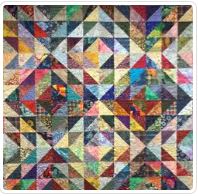
Based on a traditional design 'Sunshine and Shadow' this quilt uses half square triangles
contrasting dark, medium and light values. Suitable for beginners upwards.
Fabrics.
-
You will need a wide
range of fabrics in a variety of tonal values in dark, medium and light. I use all patterns fabrics but
you could introduce a few plain as well. Help will be given in sorting these into the correct categories to achieve the effect. If time you could cut some of the fabrics into 4" squares, giving you a head start
on the day.
|
Improv triangles are asymmetrical, easy to construct and will make a dent in your scrap bag. No matching points
or precsision piecing makes the technique suitable for beginners.
They are ideal for a number of projects : cushions, bags, quilts and borders. All you need is a pile of squares in
a variety of colours. In the workshop you will construct a panel suitable for a cushion, bag or table mat,
or the beginnings of a quilt.
Requirements.
4" squares in a variety of colours dark, light and medium 20 to start with.
Rotary Cutting: set-board, ruler and cutter. Plus sewing maching with instruction manual and your
usual sewing kit.
|
|